Developing your creative eye

With millions of images uploaded to social media and photo sharing sites everyday, you would want at least your images to be original and expressive of your style or vision. You want to produce creative images that will not only get the attention of your audience but also satisfy yourself. To do that you have to find and develop that “creative eye.” Here’s how:
1. Observe
Observation is always the first step before you ever frame your subject, compose your shot or press the shutter. Our eyes are precise machines that take in 260 degrees of horizontal field of view including peripheral vision, at 120 megapixels of high-def resolution. We have the power and facility to observe. The problem is that we are easily distracted. We fail to focus. Hence, we miss details, we miss decisive moments, we miss the light, the lines and other photographic opportunities and elements that would have otherwise made for an interesting image. Learn to hold still and concentrate on your surroundings. Being visually aware is one of the attributes of creative photographers.
2. Practice
It may be a cliche, and practice may not lead to perfection. Yet anyone will tell you that taking time to practice will help you develop your craft. Experts will always say take lots of pictures. We are now not limited to a maximum of 36 exposures in a film roll. Shoot to your heart’s content as much as your memory card can allow. Practice with your shots and practice with your camera. Do not be satisfied with snapshots, everyone is doing it. Aim for photographs of value. Bring out the artist in you, for as you do, creativity will follow.
3. Experiment
Explore your camera’s built-in shooting modes and creative filters. Take panoramic, landscape, portrait, normal shots and those with different aspect ratios. Crop in-cam, zoom, close in, fill the frame, go wide, compose, pan, frame your subject. Get that tripod and go for long exposures or low-light conditions. Attempt to learn, to probe and to understand. What you can do in photography will only be limited by your imagination.
Having a creative eye sometimes come naturally to some people. Others struggle to create compelling images. But always it can be developed. You know the approach and have the means and tools in your hands. Be patient and keep on clicking!

Where do I get inspiration for my images?

As for all the arts and works emanating from the heart and mind, we need that spark for our creations. Like wordsmiths who can have writer’s block, image-makers on occasions can also feel unimaginative and face a blank canvas. Here’s how I counter such moments of drudgery and awaken a sleeping creativity.
1. Go on location
The most enthusiastic lensman can capture exquisite images right from his home or backyard. But sometimes it takes a trip outside into the big wide world to give us photographic ideas and insights. Nature never fails to inspire the artist in us. It may not be a grand adventure or expedition but simply a walk in the beach, fishing by the lake, a picnic on a forest reserve. The breath of fresh air and views of new surroundings is sure to stimulate senses and get you grabbing that camera, seeing the world through the viewfinder.
2. View works of the masters
Bless the internet as we can see in an instant the works of the legends – Ansel Adams, Henri-Cartier Bresson, Diane Arbus, Annie Leibovitz and many more. Professionalphotographer.co.uk lists 100 Most influential photographers of all time with links to their works. I get a kick reading on their biography, how they started in photography and how they found their style. Viewing their masterpieces, for me, is an enriching experience. We may never get to reach their level, but surely we can learn a thing or two from their pioneering and innovative efforts.
3. View works of enthusiasts
The masters may teach us, yet it is the works of like-minded photography enthusiasts that influences me and keeps me grounded on reality. At this time when everyone with a smartphone can snap any picture, I actually explore Flickr and other photo sites as well as pages of photo bloggers here at WordPress, looking out for those exceptional images that stand out. I read about the photographer, their experiences, the camera settings they use to take images. It thrills me that I can be of the same level with outstanding enthusiasts, as I can never be with the masters.
4. Join a camera club
We may be members of online groupings, participating in chats and forums to learn from others. However, nothing beats joining a physical camera club where you get to brush elbows with friends and peers. Social engagement is now taken for granted what with all the social media sites around. But “facebooking” or “flickring” is never like the inspired experience of an actual photo shoot/photo walk with your club buddies.
5. Be alone
Social is good. But the clutter and chatter of our fast-paced, noisy environment distracts us from the art of “seeing” or “sensing.” I found that a place of quiet and contemplation, where the soul can be calm and the mind refreshed, can unleash imagination and vision.
Creativity is not an on or off thing like a toggle switch that can be activated at the flick of a finger. Artists are an emotional and expressive batch and they can have moods, sometimes bountiful with a wellspring of inspiration flowing continuously, at times dark and empty, an abyss of nothingness. There are moments we need to find our muse and there are things we can do to realize that. How about you, where do you draw inspiration for your images?
Have a great week ahead!
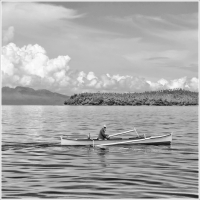
Put some textures

Observe the picture above. There are layers of textures there – the powdery sand that has seen its share of hundreds of footsteps (or sandal marks), the white strip of surf crashing on shore, the tips of aqua green waves readying their final trip towards land, those fluffy pieces of clouds on their heavenly sojourn, the rocky outcrop of mountains and islands on the horizon. Does this add clutter and confusion to the picture? No, because texture is not the first thing you’ll notice but the blue banca (outrigger canoe) that sits quietly in contrast to its surrounding. The textures here provide an interesting menagerie of patterns, colors, shadows and highlights. Though texture can be a central subject, they can be effective secondary pieces in support of the point of interest. Look out for texture. Designers and graphic artists use them for backgrounds and to fill spaces. But photographers can use texture as a more powerful element – much like shape, patterns, color and light – for subject or composition.
How much are your images worth?
 Two months ago a design company expressed interest in buying the rights to use my images. They wanted to buy an initial 100 images as first batch. I was pleasantly surprised since the only other time I sold my images was years ago – a couple of pics to a travel website, and one to a local airline for their inflight magazine. Just small deals, but this one now is big. Photography is just a hobby, and if I get to earn on the side, well why not. They asked for the price of a picture. I gave them my rate. They were aghast. They said their current photographer sells them at a low, low price. I was shocked at learning of their photographer’s rate and commented that their guy was almost giving away his images for free! I searched for their photographer’s images and, bragging aside and with all due respect to that photographer, there was no point in comparing. The company owner admitted that my images were far superior in colors, details and composition, and were exactly what they were looking for. I said quality images don’t come cheap, just like any other quality product and service out there. They were upfront enough to admit that they had no budget for my rate. Did I budge? I’m always a reasonable guy, so I lowered my rate a bit considering that they were a start-up and were buying in volume. They said they’ll think it over and would contact me. A couple of months passed and I haven’t heard from them. Did I regret my decision? No. I still believe that quality images come at a premium. Every picture I take carries a part of me with it – my patience, my knowledge, my passion, my style. Heck, a bit of my soul is on every image I make. I can’t sell that for “two-cents” worth! You want cheap, then you’ll have to settle for a cheap image somewhere else. The flower pic above was one of the many they were interested in. What do you think?
Gosh I miss this community! I miss my blogger friends here! I hope everyone is doing fine. As I always encourage everybody – keep on clicking!
Glorious details
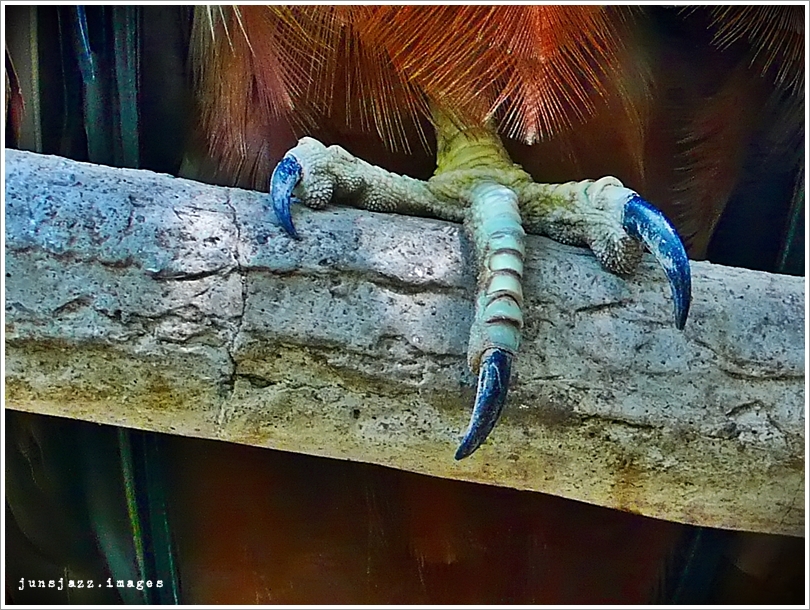 Our eyes are oriented to take in the big picture. Our front-facing horizontal field of view including peripheral vision can cover as much as 270 degrees. That’s a whole panoramic world in one snap of our eyes. That wide image that we see however is made up of small glorious details which we sometimes miss. We must train ourselves to focus and see them. One thing I’ve learned in photography is that it is as much as taking in the particulars as it is capturing the complete image.
Visual awareness

Article Excerpt:
Principles of Visual Dynamics
If you like rules, remember exceptions prove the rules. Being too insistent on the application of hard and fast rules can blind you to many exceptional opportunities. If you don’t like rules, remember that while there are no absolutes there are forces at work that have consistent tendencies. Denying or ignoring universal principles will lead to unpredictable unrepeatable results; you’ll achieve success far less frequently and be far less able to repeat your successes.
Forget rules. Forget absolutes. Forget musts. Instead develop an awareness of visual principles. Look for the unique power each element has to influence a composition. Develop a sensitivity to how elements and combination of elements make the forces at work in a composition stronger or weaker. Instead of composing formulaically, you’ll then be able to improvise. Understanding the principles of visual dynamics will help make your decision making process more informed, it will not make choices for you. Awareness is the key. Better awareness brings better choices bringing better results.
~John Paul Caponigro from his article Photographic Composition: Introduction
Composition and individual expression

Article Excerpt:
The decisions that the photographer must make are decisions that are made on the basis of feelings and emotions. Decisions that are aimed at expressing our emotional response to a scene, our perception of the subject we desire to photograph, and our personal artistic approach. All of these represent individual choices, choices that we are usually unaware of until we find ourselves in the act of capturing a specific subject with a lens and a camera. As such, this process prevents camera designers and software engineers to program either the hardware or the software to automatically express our response to the subject. They cannot program it any more than we can program it because both of us ignore what this response will be.
So what am I getting at in this explanation? I am getting at the fact that no matter how advanced and automaticized the equipment and the software we use becomes, there cannot be a substitute for individual input and expression.
What I am also getting at is the fact that the field of endeavor where this individual input is best expressed is the field of composition. Why? First, because composition is about personal choices: very few, if any, aspects of composition can be automaticized. Second, because composition is a field of endeavor composed of multiple facets and not just a set of rules. If it was just a set of rules it would be possible, theoretically, to think that these rules may be embedded in camera or computer software and that such software may have the ability to “compose” photographs on the basis of these rules, or the ability to give us directions aimed at helping us compose images in a specific way.
~Alain Briot from his article Introduction to Composition

Just plain luck

I can say that I’ve just been plain lucky to chance upon gorgeous sunset scenes. You can’t gamble with the weather and atmospheric conditions, they are as fickle as they can be. One minute it’s sunny, another minute it’s cloudy. I’m the fatalistic type, if serendipity is on your side you’ll be presented with a heavenly, once-in-a-lifetime scene. If not, better luck next time. It just so happen that with my outdoor sojourns I am sometimes greeted with spectacular sunset sceneries and, for a photographer, these are manna – blessings from heaven – scenes that I may not see again. And rightly they are rare, unique occurrences. There is never the same sunset everyday. Each is a special daily spectacle. You may have the chance or luck to be there, at that moment, or you may not. When given the chance, you just have to be ready to capture nature’s stunning, colorful display. A quote comes to mind – chance favors those who are prepared, something like that. I am always alert and mindful of photographic opportunities, knowing that I may not see the same scene again. It helps to have foresight and quick, deliberate decisions as you never know what unforgettable views you may encounter.

Colorful canvas

A sunset can be your point of interest. But then that’s just that – sun, sky, clouds, colors. Those elements may be more than enough to carry an image. Yet there are times a sunset can be an interesting backdrop, an exciting candy-colored canvas playing an important supporting role to a main subject. Why this approach? Since sunsets are often paired with sweeping horizons, putting a focal point in your foreground or middle ground indicates scale and vastness. You present an earthly dimension of size, the broadness of nature. Another thing is you ramp up your composition, arranging elements with the the use of perspectives (foreground against a background), placing main subjects in relation to minor ones (framing or rule of thirds), and presenting a general point of view (vantage points or elevated shots). You work out your shots with sunsets. You are given precious few minutes from observation to execution when the sun mellows down and dips into the horizon. And you can take on either or all approaches in a way that is interesting and captivating. You can never go wrong capturing a sunset scene. But everything can go wrong if you don’t know how to.

Sunset Week
Another week and another picture series, this time on one of my all-time favorite subjects – sunsets.

I wrote this piece titled Do The Math on April 27, 2013 and I’m reposting it.
Those few minutes before the sun finally dips into the horizon will give you some deep contrast. It’s where the darkness of ensuing night conquers the last remaining light of day. And depending on the weather, cloud formation and where the rays fall, it can give you an exquisite canvas of colors, light, silhouettes and shadows.
I have said before that I’m not a morning guy, hence I have just a few sunrise shots. But I have a whole collection of sunset scenes – reminders of the cyclical nature of life, of the eternal passing of time divided into a 24-hour day. I remember this quote from American photographer Galen Rowell:
“There are only a fixed number of sunrises and sunsets to be enjoyed in a lifetime. The wise photographer will do the math and not waste any of them.”
I would like to think that the wise photographer is the thinking photographer that we should all strive to be. Whether we have reached that level or not yet, it would add to our experience, satisfaction and skill to capture one of the most spectacular displays of nature afforded us on a daily basis. When the opportunity to photograph a great sunset is there, yes, we should not pass it up. We should “do the math.”

Wishing you all a splendid week ahead!
Without color

Article Excerpt:
Without color the components of visual design become that much more important. Look at the lines in the image. Are they horizontal? Vertical? Diagonal? Do they form a pattern? Rhythm or repeating elements in a photo are interesting, with a break in the repetition being even more interesting. Also look at the texture, shapes, and forms in the image. Concentrating on these will take your mind off the color and enhance your ability to “see” and think in monochrome.
~Joel Wolfson from his article Digital Black and White Photography Tips and Techniques

Abstract photography tips

Article Excerpt:
Quick Tips to Make Something Look More Abstract
1. An effective method is to crop out visual references that will immediately identify the subject.
2. Find something in your subject that shows clean shapes or lines.
3. Look for repeating patterns in your subject that you can focus on because they provide a sense of balance to the shot.
4. Light and shadows is a great tool in creating an abstract shot.
5. Use colors to give more impact.
~Allan Peterson from his article Abstraction in Photography
(Note: the above are short extracts; to read the full article please click on above link)

Enhance that abstraction

Article Excerpt:
The Power of the Selective Focus Technique
If you’re searching for an easy but effective abstract photography technique, selective focus is the technique for you. A narrow depth of field is achieved by the selection of a large aperture. The camera is then focused on the center of interest of the image. The rest of the objects in the image will fade into a soft blur.
There are two things which can be done to make your images even more notable when utilizing this technique. First, the color of the background should be different from the center of interest. The second point is that the center of interest can be made even stronger by using curves to point toward the center of interest.
The Use of Light and Shadows
Using the interplay of light and shadows can create drama in an image. Now, some photographers tend to think only in terms of light. This is a mistake — for light is nothing without shadows. Shadows are not just a lack of light. Instead, shadows function to make the light come to life. It is the shadows that shape the light, that draw attention to the light, and that integrate with the light to produce striking photographic opportunities. This is especially true with abstract images.
So, what is the shadows’ role in this technique? The primary role of the shadows is to help to define the forms. In other words, the shadows’ role is to help the forms to stand out. Consequently, it should come as no big surprise that the more interesting the objects in an abstract image, the more likely that the image will be successful. The shadows then function to make the more prominent.
~Ron Bigelow from his article Abstract Photography Tips and Techniques

Cuts through the clutter

These photos were taken earlier in the week during a local festival. People were in colorful, native attire. But that’s just it, I get color fatigue after featuring full vibrant pictures the whole week. If you’re new to this blog, I reserve weekends for monochrome, a respite from the magnificence of color and a return to the striking simplicity of black and white. Since these are festival images, expectedly they are filled with people and details rendering them almost a dissonance of forms, a disarray of shapes. Yet in black and white, one still finds order – a harmony of mood, expressions, movement and drama. No wonder black and white is the preferred medium for portraits, photojournalism, street and people photography. It cuts through the clutter and presents purity even with subjects in seeming disorder. It was father of Canadian photojournalism Ted Grant who said:
When you photograph people in color, you photograph their clothes. But when you photograph people in black and white, you photograph their souls!
All the best to everyone! Keep on clicking!

The most active of shapes

Magazine Excerpt:
Shapes
The most active of shapes use diagonal lines – the triangle is an eye-catching building block for your picture. Its three sides also introduce odd numbers into the photographic vocabulary. As well as triangular-shaped subjects, think about the structure of your photograph – are there three elements you could join together with imaginary lines to form a triangle?
Four sided shapes such as squares and rectangles mirror the four sides of the picture frame – there’s no conflict there, so the viewing experience isn’t as absorbing. However, they can be used alongside diagonals and triangles to produce a more exciting image.
~Digital Camera Magazine: Master Composition
Organic vs. geometric shapes

I wrote and posted this on March 4, 2013. I’m reposting it to further enhance our knowledge on “Shapes” (our picture series this week) and how it impacts on our photography.
Organic shapes are also called curvilinear that are made up of curves, angles or both. Their main characteristics are curving appearance and smooth flowing outline. They look natural and are mostly found in leaves, flowers, plants and animals. Organic shapes are out there in the natural world, created by the environment. Being free form, they don’t have uniformity and perfect measurements. Which is the exact opposite of geometric shapes. Although they may also appear in nature, geometric shapes are products of man – rectangles, squares, triangles – which are building blocks of design and construction. With the technological revolution, man can now create structures and buildings mimicking organic shapes. What’s in it for our photography?
Shapes are compositional and design elements that are visually appealing. Going for the soft curves of organic shapes or the hard corners of geometric shapes, and partnering them with the right colors, lines, patterns and light will create captivating images. A photographer once said that the eye traffics in feelings, not in thoughts. Feelings are triggered by what we see and sense. A visual stimulus of delightful shapes properly composed will evoke an equal emotional response of joy, gladness and a sense of well-being.

Shape vs. form

This article of mine was posted January 28, 2013 and I’d like to repost it in keeping with our understanding and presentation of “Shapes” which is our picture series for this week.
We use the words “form” and “shape” interchangeably. There is however a distinction. This article What Is the Difference Between Shape and Form In Photography provides a basic explanation that distinguishes between the two, and how they correlate to the concept of “space” and how, when combined, creates the element of photographic composition. We’ve been exposed to shapes early on – triangles, rectangles, squares and those with many sides (hexagon, pentagon, etc.). In a photograph, an object comes across as two-dimensional. In the accompanying photo, we know the shape of the ball, in the same manner that we know the shape of a wheel, a plate, saucer, a complete pizza, a coin as examples. When viewed flat, they are all round or circular in shape. When light falls on the subject, like the ball in the picture, it produces dark areas and shadows, highlighting its length, width and depth, and producing a three-dimensional form with the negative space around it. Learning to use this concept of space in combination with the shape and form of central subjects will help in determining the viability and effectiveness of our composition. We know the shape of a tree. When we photograph that tree with the light of a sunset in the horizon, it will cast long shadows and create a dramatic form. Composition comes to fore when we combine our focal point (the tree, already in its interesting form) with other elements in the space around it, say distant mountains in the background or a verdant field surrounding it. The thinking photographer already envisioned the scene, and it is a matter of arranging these elements in the frame to come up with a compositionally pleasing shot.
The mark of its maker

Outlines, forms, shadows, shapes, lines, light, tones, textures – these are the ingredients of black and white photography. Have fun with your imagery. Play with the elements and composition. Love the light. Bask in contrast. Experiment. Crop to exclude and emphasize. Discover. Assess with your eye. Process with your brain. Capture with your heart. With these, I can offer no other more meaningful tips when it comes to making monochrome images. With tools and knowledge, it all boils down to you – the creator and artist. After all, each picture is an individual mark of its maker.
To HDR or not
 Loboc Church, Bohol Province
Capturing High Dynamic Range (HDR) photos and processing them is one of my photographic enjoyments. Shooting a scene in its normal exposure sometimes doesn’t cut it, especially if your light is on the side or back of your subject. In that case, your subject is dark and becomes just a silhouette. Using your camera’s bracketing feature (to take three different exposure shots) or shooting in RAW format allows you to create HDR images, and post processing them later. I usually go for the former or if ever I capture in RAW I convert the image first to jpeg or tiff (to minimize noise) then process. We will not do an HDR tutorial here, but I will share my viewpoint on why I do HDR on certain subjects and scenes. First let me point you to some great links:
What is HDR Photography? by Rhommel Bernardino from PictureCorrect
How to Create High Dynamic Range Photographs from wikiHow
Photo Gallery: How to Take HDR Pictures from National Geographic
HDR allows you to present an image with all the nuances of light and the subtleties of color.
Hence HDR images are quite colorful (though this isn’t always so) with deep contrasts. When done right, you can produce images that pop right out. I am fond of HDR but only on certain subjects such as landscapes and, you guessed it right, churches. The key phrase here is “when done right.” In HDR we have the tendency to amp it up to get that “ah” and “omph” and likening it to too much salt, it spoils the broth. The standard for HDR is realism. It must look natural, but enough to bring out the details. Note the cracks, exposed bricks and signs of age on the walls of the church pictured above, or the deep yet fading (or I should say peeling) colors of the church below. In a non-HDR image, you will just see a relatively smooth wall with a few jagged lines representing cracks. So much more are exposed – light, details and information using the HDR technique. Here is an excerpt from Rhommel Bernardino in his article What is HDR Photography? (it’s the first link above):
With HDR technology, photographers can compile different photographs taken at variable exposures. Not only that but also this technique allows photographers create images with an excellent light detail, which is not possible in single shot taken by ordinary cameras. By using HDR cameras, photographers can capture excellent still photographs, in overexposed as well as underexposed settings. Though photographers have the freedom of adding several effects to the photographs, it is always recommended to keep the image as realistic as possible.
 Dauis-Panglao Church, Bohol Province
Night churches

As photographers we all know the challenges of shooting at night or in low light conditions. We need a tripod, we need to bump up the ISO, we need a “fast” lens (one with large aperture to take in more light). But I won’t delve on a tutorial on night photography, there are lots of sites that provide that. Instead let us focus on capture and composition, still with churches as subjects but taken at night.
The two images are of the Cebu Cathedral, the one above was taken last year while that below was taken several years earlier. The Cebu Cathedral has an expansive facade, so unless you have a wide angle lens you have to move way back to capture its entire front. Capturing it up front however gives you a singular, non-dimensional perspective unlike when taking a picture of it from one side. In the above photo, slanted lines give you an idea of the structure’s dimension – it is large and wide. A technique to show size and dimension is to include people or a person as reference. Note the size of the woman entering the main door. The sheer size and grandeur of the Cebu Cathedral, splendid in golden light, are emphasized. If ever there is a tinge of light remaining in the sky such as the dusk scene below you can still capture silhouette images. I was fortunate that the lamps in the front courtyard were already lighted hence providing me an appropriate foreground.
I have mentioned several times in previous posts that photography is the art of observation. Look before you shoot. You may be afforded just seconds to observe in action situations and moving subjects, so you have to be fast with your eye and finger combination. With churches and other static, immobile subjects you have all the time in the world to assess, plan and observe before you ever press that shutter. In other words, walk around, find angles, change perspective, look for details. I recall a quote from a noted photographer who said that one is likely to be rewarded with a great image if he put some planning into that capture and was deliberate with his shot, rather than leaving everything to chance. Oh, I say amen to that!

Drawn to symmetry

Article Excerpt:
Why is architectural symmetry so satisfying? As Leonardo da Vinci’s famous drawing demonstrated, it reflects the human body, which has a right side and a left, a back and a front, the navel in the very center. Du Sautoy writes that the human mind seems constantly drawn to anything that embodies some aspect of symmetry. He observes that “[a]rtwork, architecture and music from ancient times to the present day play on the idea of things which mirror each other in interesting ways.” When we walk around a Baroque church, we experience many changing views, but when we walk down the main aisle—the line along which the mirror images of the left and right sides meet—we know that we are in a special relationship to our surroundings. And when we stand below the dome of the crossing, at the confluence of four symmetries, we know we have arrived.
~Witold Rybczynski from his article Mirror Images: Why is symmetry so satisfying?
A treasure trove

The above is the facade of the St. John of Sahagun Parish Church in the historic town of Tigbauan, Iloilo province. Nothing really extraordinary in its Baroque-inspired exteriors, but wait till you get inside. Whoa, don’t scroll down and enter just yet! Before that, let me first share a description from Wikipedia:
Tigbauan, is one of Iloilo’s treasure trove, packed with “gems” from more than a millennium of historical significance. With one foot in the past, and the other in the present, Tigbauan allows every visitor a glimpse of its heady blend of architectural masterpieces and natural wonder, the town’s 134 years of history are on display when you look.
The town delights its St. John of Sahagun Parish. Constructed using forced labor under Fray Florencio Martin in 1867, its beautiful baroque facade in rococo finish, allow visitors a glimpse of the community’s intense spirituality. The church’s remarkable architecture with its façade and tower, survived the ravages of the Second World War and the great earthquake in 1948. Presently, the mystical beauty of its altar depicts heaven and Dante’s Inferno; the church walls with the Way of the cross, all done in intricate mosaic of colored stones is a sight not to be missed. On its churchyard remained a marker of what used to be the site of the first Jesuit boarding school for boys in the Philippines established in 1592 and renowned that time for their liturgical music during church services.
I guess you saw the key words and phrases “mystical beauty of its altar” and the “intricate mosaic of colored stones.” Let’s go inside. Below are a couple of images reflecting those key phrases.

You have to see the place in person to appreciate fully these spectacular works of art. The Wikipedia description doesn’t even come close. According to town folks I talked to, those are not just colored stones but also shells and corals (no environmental restriction on corals during those times) shaped into tiny tiles (thousands of them), painted, pieced and placed together, one by one, by hand. They are all around on the interior walls, columns and the famous half-dome ceiling in the main alter.

Churches are treasure troves of artifacts, relics, antiquity and extraordinary art. All are potential photographic subjects. Discover them and document them well. These are priceless – both of your images of them and the rich history that comes with them.
Elements for great B&W images

Article Excerpt:
1. Great B&W images tend to be simple, with their main components isolated and easy to identify.
2. Great B&W images tend to have depth and dimension – usually accomplished by creating visual layers that extend from the foreground to the background and all points in between.
3. Great B&W images rely on shape and/or form to make up the image. Hue and color distractions are gone. Only the shapes or forms made up by objects remain and can be arranged in such a manner that they draw the eye into or out of the photograph at the appropriate time and place.
4. Great B&W images tend to exploit contrast. The difference between the whitest white and the blackest black is the highest contrast point in the picture and this can be used to draw the viewer’s eye. Good contrast can help add depth and dimension as well.
5. Great B&W images rely on tone and texture to take the place of color and hue. This can be accomplished in many ways. Texture for instance can be enhanced with side lighting. Sometimes high ISOs are used to emulate film grain for more texture.
6. Great B&W images often rely on patterns to draw the eye into the subject of the photo. It helps form shapes and designate important elements in any B&W scene.
7. Great B&W images tend to minimize the background and accentuate the foreground. While this is not always true, if you look at the bulk of the work of some of the great old-time B&W masters, you’ll find this technique used in many of their images, particularly portraits.
~Scott Bourne from his article Seven Elements That Help Make A Great Black & White Photograph

Splash!

There is something about capturing water movement using long exposure. Ten, 15, 20 or 30-second exposure times will result in smooth, silky effects to the motion of water. We are always awed and amazed at such creative power of the camera. As everyone keen on photography knows, one needs a tripod and a steady base to achieve such effect. These three pictures, taken while I was on a rocking unsteady boat, were taken using the other creative extreme feature of the camera – fast shutter speeds enough to freeze movement. You can see water particles suspended in mid-air, a split second splash of time stopped from its proverbial march to eternity. Nothing mind-blowing really. Any camera or beginner can do this. But what strikes us, with the aid of technology, is the ability to capture a slice of time, to hold on to an extreme instance, a tick of infinity right there with the press of our fingertip. Photography endows us with this gift and capacity. The father of photojournalism Henri Cartier-Bresson expresses it this way:
“Photography is, for me, a spontaneous impulse coming from an ever attentive eye which captures the moment and its eternity.”