The most active of shapes

Magazine Excerpt:
Shapes
The most active of shapes use diagonal lines – the triangle is an eye-catching building block for your picture. Its three sides also introduce odd numbers into the photographic vocabulary. As well as triangular-shaped subjects, think about the structure of your photograph – are there three elements you could join together with imaginary lines to form a triangle?
Four sided shapes such as squares and rectangles mirror the four sides of the picture frame – there’s no conflict there, so the viewing experience isn’t as absorbing. However, they can be used alongside diagonals and triangles to produce a more exciting image.
~Digital Camera Magazine: Master Composition
To HDR or not
 Loboc Church, Bohol Province
Capturing High Dynamic Range (HDR) photos and processing them is one of my photographic enjoyments. Shooting a scene in its normal exposure sometimes doesn’t cut it, especially if your light is on the side or back of your subject. In that case, your subject is dark and becomes just a silhouette. Using your camera’s bracketing feature (to take three different exposure shots) or shooting in RAW format allows you to create HDR images, and post processing them later. I usually go for the former or if ever I capture in RAW I convert the image first to jpeg or tiff (to minimize noise) then process. We will not do an HDR tutorial here, but I will share my viewpoint on why I do HDR on certain subjects and scenes. First let me point you to some great links:
What is HDR Photography? by Rhommel Bernardino from PictureCorrect
How to Create High Dynamic Range Photographs from wikiHow
Photo Gallery: How to Take HDR Pictures from National Geographic
HDR allows you to present an image with all the nuances of light and the subtleties of color.
Hence HDR images are quite colorful (though this isn’t always so) with deep contrasts. When done right, you can produce images that pop right out. I am fond of HDR but only on certain subjects such as landscapes and, you guessed it right, churches. The key phrase here is “when done right.” In HDR we have the tendency to amp it up to get that “ah” and “omph” and likening it to too much salt, it spoils the broth. The standard for HDR is realism. It must look natural, but enough to bring out the details. Note the cracks, exposed bricks and signs of age on the walls of the church pictured above, or the deep yet fading (or I should say peeling) colors of the church below. In a non-HDR image, you will just see a relatively smooth wall with a few jagged lines representing cracks. So much more are exposed – light, details and information using the HDR technique. Here is an excerpt from Rhommel Bernardino in his article What is HDR Photography? (it’s the first link above):
With HDR technology, photographers can compile different photographs taken at variable exposures. Not only that but also this technique allows photographers create images with an excellent light detail, which is not possible in single shot taken by ordinary cameras. By using HDR cameras, photographers can capture excellent still photographs, in overexposed as well as underexposed settings. Though photographers have the freedom of adding several effects to the photographs, it is always recommended to keep the image as realistic as possible.
 Dauis-Panglao Church, Bohol Province
Framing elements

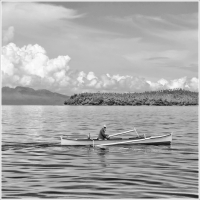
Boats in themselves are uninteresting subjects. You may frown in confusion what with a whole series of boat images filling my posts for the whole week. Boats per se are boring. You may notice that with the boat pictures I have posted so far they are always framed with some other elements – people, sunrise, beach, ports, sky, clouds, splash of water, etc. Supporting elements, background and foreground placements and overall composition will provide appeal to an image. Though boats take center stage in this week’s picture series, they may not always be the point of interest. They may take on secondary, supporting roles. The picture above may have the boat as focal point, right smack in the middle of a 16:9 aspect ratio, but what really drives the image are those large brooding clouds that may signal an upcoming thunderstorm. That is a dramatic image that foretells a story – a vessel at sea being chased by a thunderstorm. The photo below may not be high-impact, and this time the fisherman is the main cast. But it also tells a tale – the sun is high and the fisherman decides to “park” his boat in an island and take a rest under the cool shade of coconut trees. Framing elements in a photo may seem to add clutter and distraction from the main subject. But a careful arrangement of these elements simply leads the eye to the point of interest and strengthens the message or story. It’s a technique tested and used time and again. Let me close this piece with something from Annie Leibovitz:
One doesn’t stop seeing. One doesn’t stop framing. It doesn’t turn off and turn on. It’s on all the time.

Details, details

As in our tips last week on photographing stained glass windows, we tackled on zooming out or backing farther away in order to capture the whole piece. On the other hand, we are advised to zoom in on parts and areas to emphasize details. In my experiences in photographing boats I also follow that process – get it wide to capture the subject whole then zoom in on areas to get some particulars. That way I get as much perspectives and variety in my shots. Details can be a confusing mishmash of objects, colors, lines, shapes and forms such as the picture of a tanker ship below, or it can be a clean image showing the finer points of a fisherman’s gear like the picture above. Why are details important? As in anything else, details comprise the big picture. Let me share a quote from sociologist Howard S. Becker:
“Every part of the photographic image carries some information that contributes to its total statement; the viewer’s responsibility is to see, in the most literal way, everything that is there and respond to it. To put it another way, the statement the image makes – not just what it show you, but the mood, moral evaluation and casual connections it suggest – is built up from those details.”

Shapes, perspective, background and texture in B&W

Article Excerpt:
Take Shapes into Consideration
Since black and white pictures lack color, they are dependent largely on lines and shapes to create interest. Try to incorporate a variety of shapes that create different types of lines such as curving lines, crooked lines, or slanting lines. Stark straight lines can also have dramatic effects in black and white photos.
Mind Your Perspective
Perspective can create some very interesting effects, especially in black and white photography. Perspective can bring alive a standard subject, it can suggest depth and mystery in everyday objects, and, in fact, you can make a picture tell a story just by using an unusual angle while photographing a scene in black and white.
Take Care of the Background
While taking black and white photos you need to make sure that the subject does not get lost in the background. Often, just by shifting your subject a little to the left or right can help in eliminating unwanted elements in your photograph. Or you could try to take the picture from another angle.
Add Texture
Texture can add interest and definition to black and white photos. For example, a black and white picture of a roughly textured wall will certainly look more interesting than a smooth wall, or a road made of cobblestones will look more dramatic than a smooth one.
~Rita Putatunda from her article Tips for Shooting Black and White Photos
Stained glass windows: zoom in and zoom out


Article Excerpt:
Framing
Windows in churches are often quite large. Sometimes they are too big to fit completely into your frame. Experiment with framing to get around this.
Many people tend to hold their camera horizontally to take pictures, but you can also hold your camera vertically. Most windows will fit better in the frame when your camera is held in this position.
Sometimes including bits of the wall around window will naturally add interest to your picture by framing the window. Sometimes you may only want to include the window in your picture with none of the wall around it.
Look for details in the window that will look good in a picture. Sometimes taking a picture of an entire window doesn’t give you the best results. You can zoom into individual images in the glass and get a more interesting and detailed picture.
You can also deal with windows that are too big by taking separate pictures of different sections of the window and then combining them in an image editing software program.
Try a bunch of different framing options to see what looks best.
Distortion
When you take a picture of a window you’re usually looking up at it. That will distort the look of the window by making the top of it appear narrower than the bottom. You can avoid this by standing back from the window and using your zoom lens to get a closer picture.
~Stained Glass Window Photography from Digital Photography Advisor


On the hunt

Article Excerpt:
Always have your camera with you and always keep your eyes open. Serendipity plays an enormously important role in travel photography. You never know what you are going to run into, and you have to be ready. Many times you will see what could be a good photograph but decide that the light is not right, or there are no people around, or too many—something that means you will have to come back later. But sometimes you get lucky. You happen to stumble upon a scene at just the right moment. If you forgot your camera, are out of film, or your digital card is full, if you have to fumble around getting the right lens on, the moment may be gone before you can recover. This is true whether you are doing street photography or visiting a natural or man-made site. Mountains, trees, monuments, and other static subjects are, of course, not going to go anywhere, but the ray of sunshine, the soaring eagle, or the embracing couple that add the needed element to your photograph are unlikely to hang around. Think of it as hunting—whenever you leave the confines of your camp, you should be ready and able to capture whatever pops up.
~Robert Caputo from his article Travel Photography Tips
The challenge of rainforests

Article Excerpt:
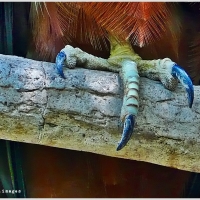
There are three aspects of rainforest photography that must always be kept in mind; 1) it is very hot and very humid in tropical rainforests, 2) it is dark in rainforests, and 3) there will be lots of neat things way up in the canopy that you will not be able to photograph, and things you will hear but never be able to see! Frustrating but fun!
In the “good old days” of film photography, the heat and humidity could sometimes cause the shutter mechanism of a camera to slow or simply stop working. Digital cameras do not have this weakness, BUT – moisture is the enemy of anything electronic. There are obvious tools to use, such as a small umbrella carried in the camera bag to hold over the camera to shoot in the rain, but more subtle than the threat of rain is that of the humidity. If you take a camera out of an air-conditioned room into a hot humid environment, moisture will condense not only on the outside of the camera and lens, but possibly inside as well. A simple solution is to keep you camera and lenses in an air-tight case, and allow time to adjust to the heat before opening the case. If you have an air-tight case, load it up with moisture-absorbing packets before your trip. A more simple approach is to keep your camera and lenses (and flash) inside sealed Zip-lock bags for a few minutes when leaving a cold room. It is OK to take them directly from the heat into your cool room – let them cool down and any moisture evaporate before putting them back in their Zip-lock bags.
It is dark in the jungle! Look for shafts of light landing on flowers or insects to find interesting contrasts. Always have your flash, and realize that without a powerful flash you probably will not be able to photograph those birds and monkeys (especially the ones that are moving!) that you see 30 feet in front of you! Plan on using your flash a lot – take extra batteries! Remember the value of fill-in flash…
~from the article Taking Photos In The Rainforest
Be like a child
The photo below is a toy of my niece. It’s a multi-colored plastic springy thing shaped like a star. I looked through it and saw, well, a star-shaped tunnel. Immediately I took my camera and tried to poke the lens through the toy to get a shot. I struggled to get a shot and tried to bend here and there the springy, elastic toy. My niece was amused at what I was doing. I was like a child again, not playing with the toy, but trying to muster a decent shot.

We photographers are the curious, inquisitive type. Upon seeing a potential photographic subject, we stare and take a look, and often fuss about it. We become a child again, wide-eyed, all the while thinking of how to tackle the subject – the angles, perspective, framing and composition. Which is a good thing because it opens our eyes to observe carefully and “see” things in a whole new light.
Martin Lee Leddy has this to say from his article Using Your Inner Child’s Eye:
“Let your eye wander to the normally unnoticed things, and go photograph them. Morning light is a wonderful source of inspiration for taking macro photos of insects, flowers, dripping water, dew covered spider webs and other things we haven’t looked for since childhood. Use wide angle lenses for photos of scenery, and search for opportunities to take other photos of things that later in the day carry no mystique. Look for dew drops, coiled hoses, shadows on the buildings and photograph them all. Enjoy seeing the wonder through the eyes of your inner child. Remember, Look for the details!”
Once the lens was snugly fit inside the other end of the springy toy, I smiled at my niece and beckoned her to look at the camera’s viewfinder and she let out a loud “wow!” upon seeing the image (which is the above photo).
The great wheel

Last weekend I was again, my second time, at the Mall of Asia in Metro Manila. My previous post about this Mall was titled The Random Shot wherein I was at an escalator inside and randomly took a picture of a geometrically interesting glass and steel ceiling. No thought and preparation came into that shot. This time around I was outside the Mall complex but within its grounds was this gigantic Ferris Wheel towering probably some ten stories high. I had an hour to spare and I wasn’t going to pass up this one without thinking of my shots and approaches. This was my first time to shoot a Ferris Wheel, and just how does one photograph something that is sure to strain the neck? Let me count the ways…Seriously, I had lots of angles and perspectives to choose from. It was high noon with thin linings of clouds; I was shooting against the light. That backdrop of sun and sky became key elements in the composition. Here is a short but spot-on tip on how to tackle the subject of Ferris Wheels:
“Ferris Wheels are a great spectacle to photograph…Going beyond the standard tourist photographs of minimal distortion (good, but not the most original) and taken at a distance away from the Ferris Wheel, try to position yourself close-up and photograph with a wide-angle lens. If the Wheel is illuminated – experiment with a slow shutter speed and capture the circular motion, creating a blur of colour and light, and remember to fill the frame – wasting no space in your composition!”
~Ferris Wheel Photography from Scott Photographics Inspiration
If I had stayed till sunset I could have captured more colorful and subdued photographs and could have experimented with long exposure. Anyway, do visit the link above which also showcases lots of Ferris Wheel images to give you an idea on the various ways to photograph this interesting subject. Here are but two of the many images I took last weekend.

Photo Quotes 148

The real shape is the circular image by the lens. I have to compose within that circle. Therefore, the problem of square versus rectangle does not disturb me. It is easy to compose a horizontal or vertical image within a circle.~Philippe Halsman
The canonical perspective
Say again? Yes folks, I also had the same quizzical expression when I first found out about this “canonical perspective.” This is from a certain Jenika, a magna cum laude graduate of psychology from Yale, who runs her own portrait photography business and a blog called Psychology for Photographers. In her blog article titled Have a Photo Problem? Try Canonical Perspective, she explains that this perspective is “to the side and slightly above” view.

She points out the following:
- We tend to recognize all sorts of objects better when they are presented to us in canonical perspective.
- It helps make pleasing images because it goes along with how we “like” to think about objects.
- Most of us probably photograph objects using the canonical perspective “rule,” whether we’re explicitly aware of it as a rule or not.
- Canonical perspective neatly lines up with how the human mind likes to picture things.
Head over to the article and read in full this enlightening topic. Discovering something like this adds up to our arsenal of techniques when taking pictures. As Jenika said we may have been using the canonical perspective without us knowing it. Reviewing my image archive I found that I had lots of pictures with subjects taken “to the side and above 30-45 degrees.” Now we know what to call this kind of view.
Be not afraid to blur

Article Excerpt:
You have been taught so strongly that blur is bad that it can be hard to accept this. However, there are times when you actually want the blur. Not only will it create a true sense of movement and action, but it will also create a very artistically appealing image. For example, think of the movement of car headlights along the highway. If you use a fast shutter speed, you will have an image of those cars. However, if you use a slower shutter speed and allow for blur, you can end up with an image full of visually appealing blur and light trails. Always keep in mind that when it comes to action digital photography, blur can be better at times. You may have to experiment with this from time to time, but it is definitely worth the work when you get that one fascinating image.
Digital photography has certainly made it so much easier to freeze action. However, it can be easy to go overboard and end up with a boring image. That means you need to use the right techniques in order to freeze the action without stopping the sense of motion.
~from the article Techniques of Freezing Action in Digital Photography
The Hogwarts effect

That’s the thing with kids. The Harry Potter films have such influence on them that they go zipping around in brooms practicing their flying skills. Like my niece in the above photo whom I chanced upon doing her fly-bys at the garage. Well, this stop-action image is made possible with a shutter speed of 400th of a second at an opening of F/3.8. Of course, the subject should really be a high jumper. Hehe…

The stop-action shot

Article Excerpt:
In order to give an image a stop-action look, you’ll either need to use your camera’s sports/action mode (indicated by the running figure on the basic shooting mode dial), or your shutter-priority mode to set a fast shutter speed. In this mode, denoted by the Tv (time value) or S (shutter) mode on your shooting dial, you set the desired shutter speed and your camera will automatically set the aperture to get the best exposure. By using a shutter speed of at least 1/500—and especially at 1/1000 to 1/5000 second—you can freeze nearly all activities, including those that happen too quickly to be perceived by the human eye. A person will appear to be suspended in mid-air, while water droplets seem frozen in space. You’ll also need good lighting in order to freeze motion, so it’s best to shoot these images in a well-lit interior venue or on a sunny day. I also advise using an ISO setting of at least 400 to help stop action as well.
~Lynne Eodice from her article How-To: Capturing Action & Motion
Catching the action
Though I’m a nature, landscape, flower, sunset type of guy, I also love action and sports photography. There’s nothing like the thrill of capturing a moving subject and freezing that subject in your frame. I get to engage in this type of photography when taking pictures of festivals (my fave subjects are street dancers doing their frenetic choreography) and community sports like the inter-county juniors’ basketball game in the photo below.

I usually set the camera mode dial at shutter-priority (S on Nikon and TV on Canon) and at times on burst mode. But there is more to this. In his exhaustive article titled How To Shoot Action and Sports Photography, author Philip Andrews offers some guidelines, shooting techniques and the proper equipment to use. Some of the salient things he points out include the following:
- It’s all in the timing
- Finding shots
- Pre-planning
- Split-second opportunities
- Don’t watch – shoot
- Look beyond the obvious
- The right kit and gear
- Post-processing tips
- Freezing the action
- Focusing issues
…and a whole lot more. If you want to improve your action and sports photography, this article has all the important stuff covered. Many photographers have successfully carved a career in sports photography. You see them on the sides in basketball courts, tennis matches and Olympic events with their “bazooka” lenses. The images they take find their way into magazines, newspapers, ads and other publications. They are professionals. We are mere mortals, enjoying a snap here and there. But it helps to know the techniques of action and sports photography especially when the time comes when your kid takes his first swimming lesson (you’ve got to capture the dive!), bats his first ball, or his first dribble and drive to the hoop. Important life moments involving family and friends are actually slices of action. You don’t want to miss those.
The flower shot: things to consider

Article Excerpt:
A single flower needs to be almost caressed by the camera. There should be an intimate connection between a single flower and the viewer when you isolate it from its companions. It needs to be given special attention. Does it have a fragrance? Does it have a special shape with contours (perhaps like an orchid or iris)? Is it straight forward and open like a sunflower or daisy?
There are some decisions that must be made as you begin working to make a special image. Are you going to blur the background so that the flower is isolated in its glory? How close are you going to get? Do you want the entire flower or just a part of it? What kind of lighting will show it off best? Are their water drops on the flower? Would it look better if there were?
When working an individual flower, I like to keep the design of the image as simple as possible. I consider taking the bird’s eye view of the flower or the worm’s eye view. I move around to get the best light…
~Noella Ballenger from her article Flowers: Beautiful Beautiful Flowers
Going beyond the literal

Article Excerpt:
Beginners often photograph their subjects literally. There’s nothing wrong with that. Many times, though, an ordinary subject can be made extraordinary. That is rarely due to the subject and almost always a reflection of the photographer. Extraordinary photographers do not see their subjects only literally…
Begin to look at your compositions as visual elements, rather than merely literal subjects, you will go a long way towards taking photographs to be proud of. Remembering that photographic images are made of tone, shapes, and lines and their relationships will make it easier for you to find a good composition, no matter what the subject. And you’ll know that even old subjects can be shot anew, no matter who tells you differently.
~Bernhard J. Suess from his article Back to Black-and-White: Choosing Subjects for Black and White Photographs
Calculated luck

Article Excerpt:
Candid Photography as an Art Form, is I’ll admit part luck but its calculated luck. You put yourself in a place or position that gives you the greatest chance of capturing a subject that suits your eye, or at least comes close to what you’re looking for. If you find something of interest you can’t pose it you have to take it as it is or have the patience of a saint to wait it out until it gives you an opportunity for a reasonable shot. If it’s the type of subject that is movable then you have fractions of a second to compose the shot set the focus and shoot it. If you have the wrong lens at the time or the lighting isn’t the best you don’t have time to change it, you do the best you can with what you have. You can’t control the lighting unless you spend the time to determine when is the best time to get the shot you want with the best lighting. It’s the most frustrating art media I have ever dealt with. To come up with a truly candid artistic photograph you might be lucky if you get the opportunity to come up with one acceptable shot out of hundreds…It is my opinion that a good photographic artist has to have the eyes of an eagle to be able to focus and see its subject at the best angle in order to capture it, the speed of a mongoose avoiding the bite of a cobra, the patience of a saint and the dexterity to utilize their equipment available to them at the moment instantly and correctly.
~Paul Viverito from his article Candid Photography as an Art Form
Photo Quotes 142

The photographer cannot be a passive spectator; he can be really lucid only if he is caught up in the event.~Henri Cartier-Bresson
Capturing life moments
Candid photography is about capturing life moments as they happen. This is where the photographer is unnoticed by the subject, hence there is no posing or awkwardness. It’s the real deal, a slice of life that is documented. Candid shots are best for sports action, group activities and street photography.
I’m sharing an article by Sarah Harbuck titled Photography Tips: How to Take Better Candid Photos. In it she presents the following:
1. Become inseparable with your camera.
2. Take lots of photos.
3. Turn your flash off.
4. Use a zoom lens.
5. Get in the right position.
6. Use your creativity.
7. Be in the moment.
8. Observation is key.
9. Melt into the background.
10. Don’t try too hard.
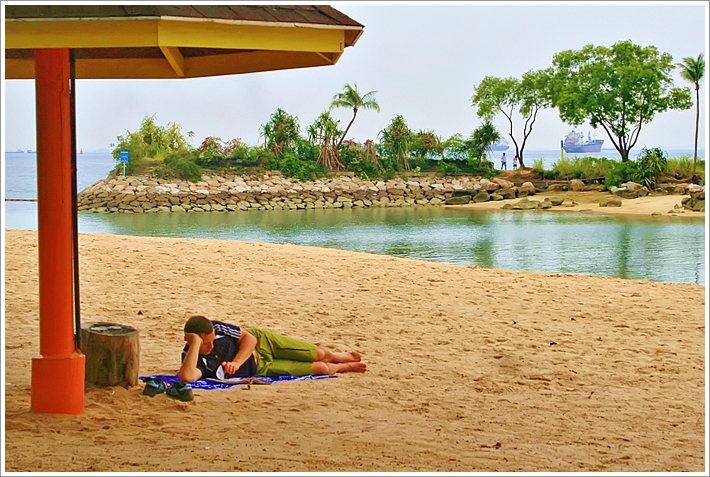
If you can spare a minute, head over to the article and read it in full. Candid images are fun, spontaneous and unreserved. They are images we can relate with, all too human and all too normal – a tick of time and a second of daily life recorded for posterity. The above photo was taken at Sentosa Resort in Singapore where a lone guy enjoys a good read by the beach. Happy candid snapping!
Seek out graphic elements

Article Excerpt:
No “graphic photographs” do not have anything to do with adult themed images. Graphical photography is an image style that utilizes shape, geometry and color to resemble something that might be drawn or designed. Photographs that are considered graphic in nature have distinct curves & lines, color contrast and highlight geometry within a particular scene. It may sound more complex than it really is, as I’m sure you’ve seen photos everywhere that fit this description.
Finding and taking photographs with a strong graphic element takes an observant eye. Man-made objects such as machinery, architecture, roads, etc. are inherently great graphic photography subjects because they’re designed with geometry in mind by engineers, architects and civic planners. Nature subjects also have a strong geometric shape rooted in the molecular geometry of organic compounds like cellulose and inorganic compounds with crystalline structures like quartz. Whether your subject is made by man or nature if you add light, shadow and color plus follow the 5 tips below you have all the ingredients needed for a great graphic photos.
~Jim Goldstein from his article 5 Tips to Create Graphic Photographs
The bird’s eye view

Article Excerpt:
One of the easiest ways to change your perspective is to shoot from a higher vantage point. In other words, be prepared to get physical and do a little exercise climbing a mountain, ladder, tree, or just some steps When shooting above and looking down it’s almost as if you have a bird’s eye perspective of what is going on below. From a higher vantage point you can take great shots of parades, crowds, traffic or scenic valley views. The rewards of doing this are that ‘many’ other photographers are simply too lazy to ‘climb’ something. This is a travel photography tip that can’t be underestimated: putting in a bit of grunt work.
~Samuel Jeffery from his article Change Your Vantage Point