Composition and individual expression

Article Excerpt:
The decisions that the photographer must make are decisions that are made on the basis of feelings and emotions. Decisions that are aimed at expressing our emotional response to a scene, our perception of the subject we desire to photograph, and our personal artistic approach. All of these represent individual choices, choices that we are usually unaware of until we find ourselves in the act of capturing a specific subject with a lens and a camera. As such, this process prevents camera designers and software engineers to program either the hardware or the software to automatically express our response to the subject. They cannot program it any more than we can program it because both of us ignore what this response will be.
So what am I getting at in this explanation? I am getting at the fact that no matter how advanced and automaticized the equipment and the software we use becomes, there cannot be a substitute for individual input and expression.
What I am also getting at is the fact that the field of endeavor where this individual input is best expressed is the field of composition. Why? First, because composition is about personal choices: very few, if any, aspects of composition can be automaticized. Second, because composition is a field of endeavor composed of multiple facets and not just a set of rules. If it was just a set of rules it would be possible, theoretically, to think that these rules may be embedded in camera or computer software and that such software may have the ability to “compose” photographs on the basis of these rules, or the ability to give us directions aimed at helping us compose images in a specific way.
~Alain Briot from his article Introduction to Composition

To HDR or not
 Loboc Church, Bohol Province
Capturing High Dynamic Range (HDR) photos and processing them is one of my photographic enjoyments. Shooting a scene in its normal exposure sometimes doesn’t cut it, especially if your light is on the side or back of your subject. In that case, your subject is dark and becomes just a silhouette. Using your camera’s bracketing feature (to take three different exposure shots) or shooting in RAW format allows you to create HDR images, and post processing them later. I usually go for the former or if ever I capture in RAW I convert the image first to jpeg or tiff (to minimize noise) then process. We will not do an HDR tutorial here, but I will share my viewpoint on why I do HDR on certain subjects and scenes. First let me point you to some great links:
What is HDR Photography? by Rhommel Bernardino from PictureCorrect
How to Create High Dynamic Range Photographs from wikiHow
Photo Gallery: How to Take HDR Pictures from National Geographic
HDR allows you to present an image with all the nuances of light and the subtleties of color.
Hence HDR images are quite colorful (though this isn’t always so) with deep contrasts. When done right, you can produce images that pop right out. I am fond of HDR but only on certain subjects such as landscapes and, you guessed it right, churches. The key phrase here is “when done right.” In HDR we have the tendency to amp it up to get that “ah” and “omph” and likening it to too much salt, it spoils the broth. The standard for HDR is realism. It must look natural, but enough to bring out the details. Note the cracks, exposed bricks and signs of age on the walls of the church pictured above, or the deep yet fading (or I should say peeling) colors of the church below. In a non-HDR image, you will just see a relatively smooth wall with a few jagged lines representing cracks. So much more are exposed – light, details and information using the HDR technique. Here is an excerpt from Rhommel Bernardino in his article What is HDR Photography? (it’s the first link above):
With HDR technology, photographers can compile different photographs taken at variable exposures. Not only that but also this technique allows photographers create images with an excellent light detail, which is not possible in single shot taken by ordinary cameras. By using HDR cameras, photographers can capture excellent still photographs, in overexposed as well as underexposed settings. Though photographers have the freedom of adding several effects to the photographs, it is always recommended to keep the image as realistic as possible.
 Dauis-Panglao Church, Bohol Province
Photo Quotes 148

The real shape is the circular image by the lens. I have to compose within that circle. Therefore, the problem of square versus rectangle does not disturb me. It is easy to compose a horizontal or vertical image within a circle.~Philippe Halsman
The canonical perspective
Say again? Yes folks, I also had the same quizzical expression when I first found out about this “canonical perspective.” This is from a certain Jenika, a magna cum laude graduate of psychology from Yale, who runs her own portrait photography business and a blog called Psychology for Photographers. In her blog article titled Have a Photo Problem? Try Canonical Perspective, she explains that this perspective is “to the side and slightly above” view.

She points out the following:
- We tend to recognize all sorts of objects better when they are presented to us in canonical perspective.
- It helps make pleasing images because it goes along with how we “like” to think about objects.
- Most of us probably photograph objects using the canonical perspective “rule,” whether we’re explicitly aware of it as a rule or not.
- Canonical perspective neatly lines up with how the human mind likes to picture things.
Head over to the article and read in full this enlightening topic. Discovering something like this adds up to our arsenal of techniques when taking pictures. As Jenika said we may have been using the canonical perspective without us knowing it. Reviewing my image archive I found that I had lots of pictures with subjects taken “to the side and above 30-45 degrees.” Now we know what to call this kind of view.
Be not afraid to blur

Article Excerpt:
You have been taught so strongly that blur is bad that it can be hard to accept this. However, there are times when you actually want the blur. Not only will it create a true sense of movement and action, but it will also create a very artistically appealing image. For example, think of the movement of car headlights along the highway. If you use a fast shutter speed, you will have an image of those cars. However, if you use a slower shutter speed and allow for blur, you can end up with an image full of visually appealing blur and light trails. Always keep in mind that when it comes to action digital photography, blur can be better at times. You may have to experiment with this from time to time, but it is definitely worth the work when you get that one fascinating image.
Digital photography has certainly made it so much easier to freeze action. However, it can be easy to go overboard and end up with a boring image. That means you need to use the right techniques in order to freeze the action without stopping the sense of motion.
~from the article Techniques of Freezing Action in Digital Photography
The Hogwarts effect

That’s the thing with kids. The Harry Potter films have such influence on them that they go zipping around in brooms practicing their flying skills. Like my niece in the above photo whom I chanced upon doing her fly-bys at the garage. Well, this stop-action image is made possible with a shutter speed of 400th of a second at an opening of F/3.8. Of course, the subject should really be a high jumper. Hehe…

The stop-action shot

Article Excerpt:
In order to give an image a stop-action look, you’ll either need to use your camera’s sports/action mode (indicated by the running figure on the basic shooting mode dial), or your shutter-priority mode to set a fast shutter speed. In this mode, denoted by the Tv (time value) or S (shutter) mode on your shooting dial, you set the desired shutter speed and your camera will automatically set the aperture to get the best exposure. By using a shutter speed of at least 1/500—and especially at 1/1000 to 1/5000 second—you can freeze nearly all activities, including those that happen too quickly to be perceived by the human eye. A person will appear to be suspended in mid-air, while water droplets seem frozen in space. You’ll also need good lighting in order to freeze motion, so it’s best to shoot these images in a well-lit interior venue or on a sunny day. I also advise using an ISO setting of at least 400 to help stop action as well.
~Lynne Eodice from her article How-To: Capturing Action & Motion
Catching the action
Though I’m a nature, landscape, flower, sunset type of guy, I also love action and sports photography. There’s nothing like the thrill of capturing a moving subject and freezing that subject in your frame. I get to engage in this type of photography when taking pictures of festivals (my fave subjects are street dancers doing their frenetic choreography) and community sports like the inter-county juniors’ basketball game in the photo below.

I usually set the camera mode dial at shutter-priority (S on Nikon and TV on Canon) and at times on burst mode. But there is more to this. In his exhaustive article titled How To Shoot Action and Sports Photography, author Philip Andrews offers some guidelines, shooting techniques and the proper equipment to use. Some of the salient things he points out include the following:
- It’s all in the timing
- Finding shots
- Pre-planning
- Split-second opportunities
- Don’t watch – shoot
- Look beyond the obvious
- The right kit and gear
- Post-processing tips
- Freezing the action
- Focusing issues
…and a whole lot more. If you want to improve your action and sports photography, this article has all the important stuff covered. Many photographers have successfully carved a career in sports photography. You see them on the sides in basketball courts, tennis matches and Olympic events with their “bazooka” lenses. The images they take find their way into magazines, newspapers, ads and other publications. They are professionals. We are mere mortals, enjoying a snap here and there. But it helps to know the techniques of action and sports photography especially when the time comes when your kid takes his first swimming lesson (you’ve got to capture the dive!), bats his first ball, or his first dribble and drive to the hoop. Important life moments involving family and friends are actually slices of action. You don’t want to miss those.
The flower shot: things to consider

Article Excerpt:
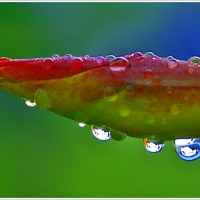
A single flower needs to be almost caressed by the camera. There should be an intimate connection between a single flower and the viewer when you isolate it from its companions. It needs to be given special attention. Does it have a fragrance? Does it have a special shape with contours (perhaps like an orchid or iris)? Is it straight forward and open like a sunflower or daisy?
There are some decisions that must be made as you begin working to make a special image. Are you going to blur the background so that the flower is isolated in its glory? How close are you going to get? Do you want the entire flower or just a part of it? What kind of lighting will show it off best? Are their water drops on the flower? Would it look better if there were?
When working an individual flower, I like to keep the design of the image as simple as possible. I consider taking the bird’s eye view of the flower or the worm’s eye view. I move around to get the best light…
~Noella Ballenger from her article Flowers: Beautiful Beautiful Flowers
Going beyond the literal

Article Excerpt:
Beginners often photograph their subjects literally. There’s nothing wrong with that. Many times, though, an ordinary subject can be made extraordinary. That is rarely due to the subject and almost always a reflection of the photographer. Extraordinary photographers do not see their subjects only literally…
Begin to look at your compositions as visual elements, rather than merely literal subjects, you will go a long way towards taking photographs to be proud of. Remembering that photographic images are made of tone, shapes, and lines and their relationships will make it easier for you to find a good composition, no matter what the subject. And you’ll know that even old subjects can be shot anew, no matter who tells you differently.
~Bernhard J. Suess from his article Back to Black-and-White: Choosing Subjects for Black and White Photographs
Calculated luck

Article Excerpt:
Candid Photography as an Art Form, is I’ll admit part luck but its calculated luck. You put yourself in a place or position that gives you the greatest chance of capturing a subject that suits your eye, or at least comes close to what you’re looking for. If you find something of interest you can’t pose it you have to take it as it is or have the patience of a saint to wait it out until it gives you an opportunity for a reasonable shot. If it’s the type of subject that is movable then you have fractions of a second to compose the shot set the focus and shoot it. If you have the wrong lens at the time or the lighting isn’t the best you don’t have time to change it, you do the best you can with what you have. You can’t control the lighting unless you spend the time to determine when is the best time to get the shot you want with the best lighting. It’s the most frustrating art media I have ever dealt with. To come up with a truly candid artistic photograph you might be lucky if you get the opportunity to come up with one acceptable shot out of hundreds…It is my opinion that a good photographic artist has to have the eyes of an eagle to be able to focus and see its subject at the best angle in order to capture it, the speed of a mongoose avoiding the bite of a cobra, the patience of a saint and the dexterity to utilize their equipment available to them at the moment instantly and correctly.
~Paul Viverito from his article Candid Photography as an Art Form
Capturing life moments
Candid photography is about capturing life moments as they happen. This is where the photographer is unnoticed by the subject, hence there is no posing or awkwardness. It’s the real deal, a slice of life that is documented. Candid shots are best for sports action, group activities and street photography.
I’m sharing an article by Sarah Harbuck titled Photography Tips: How to Take Better Candid Photos. In it she presents the following:
1. Become inseparable with your camera.
2. Take lots of photos.
3. Turn your flash off.
4. Use a zoom lens.
5. Get in the right position.
6. Use your creativity.
7. Be in the moment.
8. Observation is key.
9. Melt into the background.
10. Don’t try too hard.
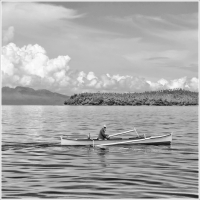
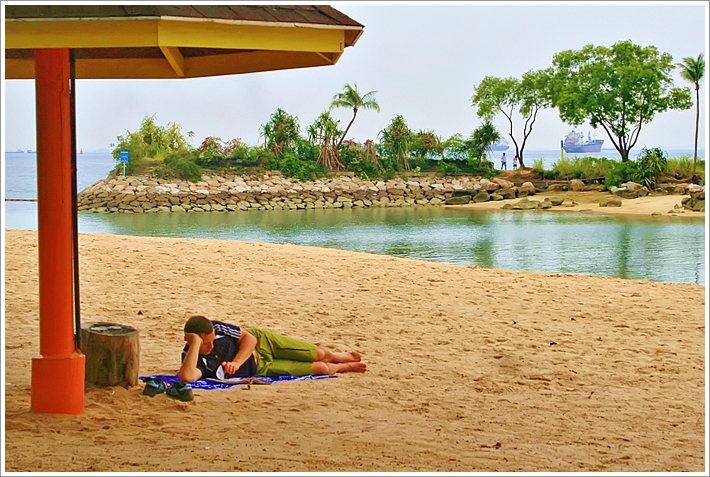
If you can spare a minute, head over to the article and read it in full. Candid images are fun, spontaneous and unreserved. They are images we can relate with, all too human and all too normal – a tick of time and a second of daily life recorded for posterity. The above photo was taken at Sentosa Resort in Singapore where a lone guy enjoys a good read by the beach. Happy candid snapping!
Seek out graphic elements

Article Excerpt:
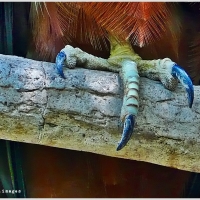
No “graphic photographs” do not have anything to do with adult themed images. Graphical photography is an image style that utilizes shape, geometry and color to resemble something that might be drawn or designed. Photographs that are considered graphic in nature have distinct curves & lines, color contrast and highlight geometry within a particular scene. It may sound more complex than it really is, as I’m sure you’ve seen photos everywhere that fit this description.
Finding and taking photographs with a strong graphic element takes an observant eye. Man-made objects such as machinery, architecture, roads, etc. are inherently great graphic photography subjects because they’re designed with geometry in mind by engineers, architects and civic planners. Nature subjects also have a strong geometric shape rooted in the molecular geometry of organic compounds like cellulose and inorganic compounds with crystalline structures like quartz. Whether your subject is made by man or nature if you add light, shadow and color plus follow the 5 tips below you have all the ingredients needed for a great graphic photos.
~Jim Goldstein from his article 5 Tips to Create Graphic Photographs
The bird’s eye view

Article Excerpt:
One of the easiest ways to change your perspective is to shoot from a higher vantage point. In other words, be prepared to get physical and do a little exercise climbing a mountain, ladder, tree, or just some steps When shooting above and looking down it’s almost as if you have a bird’s eye perspective of what is going on below. From a higher vantage point you can take great shots of parades, crowds, traffic or scenic valley views. The rewards of doing this are that ‘many’ other photographers are simply too lazy to ‘climb’ something. This is a travel photography tip that can’t be underestimated: putting in a bit of grunt work.
~Samuel Jeffery from his article Change Your Vantage Point
Capturing the realism
The picture below was taken at Baluarte, a seaside park in the tourist island province of Bohol in central Philippines. When I reviewed the picture in my computer, it was far from what I saw on that day. My picture was bland and boring. It had to undergo post-processing to highlight the colors and details to more or less approximate the actual scene. How do we go about capturing the realism of a scene when we first saw it?

Kimball Larsen shares some pointers in his article 10 Photography Tips To Better Capture What You See. They are the following:
1. Decide on a clear center of attention
2. Remember that your eye has a better dynamic range than your camera
3. Aperture control for DOF
4. Careful composition to either expand upon or contract the feel of the photo
5. Be ready – moments come and go quickly
6. Understand the exposure triangle
7. P is not for “Professional”
8. Pay attention to your light sources
9. Always check your camera settings
10. Practice!
Again I suggest you go over the article and read Larsen’s descriptions on each tip. Giving thoughtful consideration to the above items will greatly improve our picture-taking. It helps elevate us to the level of a thinking photographer, deliberate and confident that our every shot will result in a faithful capture of what we saw. Happy shooting this weekend!
Time exposure

Here are very interesting photography tips all relating to time exposure. This is just a partial list, head over to the online site to view the articles and photo samples.
Photo Tip: Every photograph is actually a time exposure. Images may be recorded in a fraction of a second or over hours of time. Yet many people never realize that they can use time as a creative tool in photography. Remember that the shutter speed can be adjusted to do either very long or instantaneous exposures.
Photo Tip: The method of choosing a long shutter speed and following the action as it takes place is called “panning.” Part of the fun of panning is that the photographer is never really certain how the resulting image will turn out. Photographing in this way can sometimes reveal things that our eyes cannot see.
Photo Tip: By understanding how the shutter speed and the aperture settings of a camera work together in any exposure, the photographer can make deliberate choices about what he or she would like to capture. Automatic settings are great for many things, but a basic knowledge of how the camera works will lead to far more creative photography.
Photo Tip: It doesn’t take a long exposure time to blur rushing water. Sometimes the camera can be handheld while achieving this effect. But take a tripod along so that you can try exposures of various length and see which results you like best.
Photo Tip: Although we are tempted to use a very fast shutter speed when photographing wildlife behavior, slowing things down may lead to a more compelling image. The goal is not always a perfectly sharp image.
Photo Tip: Remember, the photographer can move too! You can twirl or run or pan with your camera to create new views. And by varying your shutter speed as you move, a whole series of surprise images can be created.
~National Geographic photography tips feature Simply Beautiful Photos: Time
The essential ingredient in sunset shots

Article Excerpt:
Ok, but there’s more to picking the right spot than just the location. As important as location is, your sunset will almost always be lacking the one essential ingredient that will make it special – a dominant point of interest. And just what might that be? It’s that extra element that gives your sunset an anchor, a sense of scale, a point which will draw the viewer inevitably into the picture.
A photograph of a sunset by itself just doesn’t work. After all, one setting sun is much like any other. Even if you manage to capture the gorgeous color, without a dominant point of interest the image will still end up looking rather boring. Now, having said that I should tell you that, without some forward planning, a dominant point of interest is not an easy thing to include. It might be the silhouette of a sailboat on a glittering, backlit ocean, a barn, a horse, a cow, a tractor, or even a lone tree in the foreground. It could be the silhouette of two lovers walking hand-in-hand down a country lane, a little girl with a small dog on a leash – I’ve used both of those – and I’m sure you can come up with many more ideas of your own.
~Blair Howard fron his article How To Photograph Sunsets
Show your world

Article Excerpt:
The advent of digital photography and today’s prevalence of affordable digital SLR cameras ensures more people have the capability to capture an inspiring photo. The only question is how to gain the creative skills, aptitude and dedication to make it happen. First we need to understand the basics of what makes a great travel or adventure photo.
East Africa-based adventure writer and photographer Nathan Ward reveals travel photography is about finding the image within its natural setting. “Find big scenery and local colour. Ideally something without a westerner in it! The world isn’t about a photo of some blonde person in their new Patagonia gear standing next to Tsaatan reindeer herders. The story is about the reindeer herders. Show the world and all its magic,” he says.
Finding the image within its natural setting is individual and we all differ in our visual perspective, however when it comes to releasing the shutter, the basic ingredients to attention-grabbing pictures has remained the same since the inception of photography; thoughtful composition, creative lighting and an interesting subject.
~Mark Watson from his article Sharp Shooters: Photography Tips
The location

Article Excerpt:
Here are a few places to consider when heading out to start your photography adventure.
Water: It doesn’t matter where you live or where you go, you are sure to find lakes, rivers and streams with beautiful landscapes surrounding them. On the coasts, you can get amazing shots of oceans as well. When looking at these locations, determine what makes them unique. Is it a fast moving river or a lazy, slow stream? Figure this out and then decide if you want it to be the focal point of your composition or just a device to use to focus on something beside or in it. You can also find amazing reflections in the water, which will enhance your photographs even more.
Forests: Forests present a photographer with numerous opportunities. Look around and decide if the forest is open and welcome or enclosed and gloomy. When you find the “personality” of the forest, decide what objects in the forest will allow that attitude to come to life in your photographs. It can be a tree, a winding path or a colorful break in the greenery. Find what makes the forest come to life and capture it in your photographs.
Plains: The wide open spaces, especially in the Midwest, can seem dreary and boring but, with the right eye, this can also become the scenic photographers dream. The most important thing to find here is something to focus on. Find an old road sign, a barbed wire fence or an old gravel road and then use these items to show the vastness of the open space beyond it. The plains are also a great place to get amazing shots of the sky as it morphs and changes colors throughout the year.
Mountains: Remember, you are not just shooting mountains, you are shooting something with the mountains in the background. Sure, there can be some amazing pictures displaying the curves of the mountains but those photographs can get boring after awhile. Instead, find something close to the camera, such as a tree or a person admiring the mountain. Using this subject, the mountains will look vast and immense in comparison.
~Shawn Lealos from his article Scenic Photography: Getting the Most out of Your Outdoor Shoot
Visualize in black and white

Article Excerpt:
Think about the non-color visual design elements of your image. Without color the components of visual design become that much more important. Look at the lines in the image. Are they horizontal? Vertical? Diagonal? Do they form a pattern? Rhythm or repeating elements in a photo are interesting, with a break in the repetition being even more interesting. Also look at the texture, shapes, and forms in the image. Concentrating on these will take your mind off the color and enhance your ability to “see” and think in monochrome.
Train your brain for black and white by comparing the same images in both black and white and color. Most photo software lets you go back and forth between images or look at them side-by-side. A good way to teach yourself how to visualize in black and white is to look at the same image both ways. Do this with as many images as you can. I would include images that you initially intended to be black and white as well as those that were not intended that way. Sometimes you will discover great black and white images that weren’t shot with that purpose. More importantly it will ultimately help you be able to look at a color scene in the world and visualize it as a black and white image.
~Ashley Robinson from her article Digital Black and White Photography Tips and Techniques
Look deeper
Prolific writer of photography tips Jim Harmer shares some guides in his article 15 Tips for Stunning Black and White Photography. I will just list some of them and urge you to go over his very enlightening write-up.

Here is a partial listing:
- Shoot in RAW.
- To visualize in black and white, only pay attention to lines, shadows, and shapes.
- Pay special attention to noise.
- Look for contrast.
- Find a wide range of grays.
- Watch for texture.
- Look for patterns.
- Long exposures love black and white.
- B&W isn’t a replacement for bad lighting, but it can soften the blow.
With today’s digital cameras and powerful image editing programs, it is very easy to experiment in black and white. Some photographers find their “voice”, vision and style through this classic medium. It forces photographers to “see” more and look deeper for fine nuances and interesting characteristics in subjects, as opposed to shooting haphazardly in color, and letting the color element speak for the whole image. You have the tools of discernment and insight in black and white photography. Use them skillfully.
Inspiration from within

Article Excerpt:
However, back then I did not realize that there is a second level of inspiration. This second level of inspiration is our own work, the work we create following the spark of inspiration I just described. At that time, when new work is being created, this work in turns becomes the source of inspiration, of new ideas. This work starts to generate ideas for more work. It becomes the motivation for going further into a specific direction and for continuing to explore a specific subject.
I vividly remember the day that I found my work more inspiring than the work of the masters that had so far guided my steps. It came as a shock and at first it felt sacrilegious. But the feeling persisted and revealed itself to be a lasting fact rather than a passing impression.
As time went by and as my work progressed I became more and more inspired by my work and less and less inspired by other photographers’ work. Today, I continue to find inspiration in the work of artists but as time goes by this inspiration increasingly comes from artistic mediums other than photography. I find inspiration in writing, painting, music, architecture and in the design of functional and beautiful objects, be it cars, ceramics, tableware, light fixtures or a multitude of other things. I love to discover objects that demonstrate a seamless relationship between form and function. In turn, I like to collect and own such superb examples of artistic design to which practicality and art have been given equal attention.
~Alain Briot on External and Internal Inspiration, from his article Finding Inspiration
Something that evolves

Article Excerpt:
Creation is the birth of something, and something cannot come from nothing. When someone creates something: a painting, a poem, a photograph, the creativity comes from an idea, from a feeling, from emotion, or from a combination of ideas, feelings and emotions that are somehow ‘reborn’ from all our experiences and perspectives.
Creativity is the desire to express ourselves. To formulate these expressions, we have to draw from our reservoir of experience, dreams, desires and experimentation and mix together what was, what is, and what could be… I don’t think you can learn it, it is rather something that evolves. Your perception of everything in your life fills up this reservoir.
~Peter Lindbergh on Creativity, from his official website