Create contrast with complementary colors

Article Excerpt: “What makes an image colorful? Is it the mere presence of bright colors, or is it something more than that? Color isn’t always about having bright reds and striking blues. It results from creating color contrast in your photos and using complementary colors whenever you can…Let’s not make this more complicated than it needs to be. Complementary colors are different colors that, when placed next to one color, increase the total color contrast in the image. But a complementary can’t just be a different shade of one color…It needs to be a different type of color altogether.”~David Peterson from his article Make Your Photos More Colorful with Complementary Colors
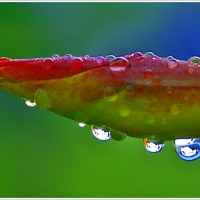
Emphasize with color contrast
 There are two types of contrast used in photography. First is the tonal contrast, mostly used in black and white photography. It is the variance between the light and dark parts of an image. In between the white and black are various tonal range, think of it as gradations of gray. The second type is color contrast. Looking at the color wheel you will see the colors near each other and those directly opposite. Color theory and concepts are complicated matters. I think there are even courses on these. It’s because colors and their relationship with one another are important to a lot of people and their profession such as designers, painters, graphic and visual artists. It is a primary element of design, and even in areas of advertising, marketing and promotion, color plays an important role. It creates mood, emotions, character, temperament and personality. Needless to say, the importance is carried in color photography. Understanding colors and how they complement and interact with each other will greatly help in composition. In an earlier post we touched on selective focus to emphasize a subject. You can do likewise with color contrast. A green apple in a red background or surrounding will stand out. In the color wheel, those colors that are directly opposite each other are called complementary colors. Of course the just mentioned example will also work the other way around – a red subject against a predominantly green background. So will yellow against violet or blue. Such as in the picture above. The yellow rubber ducky will get your attention not only because it seems to be looking at you but also because it is set in a blue surrounding. You get to highlight your subject with the deliberate use of color contrast. Now spotting this situation in the real world will need some getting used to, especially for those starting out. But for the keen photographer, he will easily notice a subject that stands out because of its color in relation to its background. He is trained to scan, spot and notice. After all, the first code of photographers is not to shoot, but to observe. Get a more detailed understanding of our topic by reading the article How Contrast Affects Your Photos by David Peterson, founder of online site Digital Photo Secrets.
Each is unique

The above piece is from the “Citylines” series at Junsjazz Art & Vision blog. The problem (if you can call it that) with these artworks is that I cannot “recreate” them; they are one time creations. Though I have the base composite image, when I try again to go through the exact process of applying creative filters and effects, the result is just not the same with the original piece. Unlike in photography when you apply the same editing process, you get the same result over and over again with a particular image. I guess that’s the individuality of art, the are meant to be created once. Afterwards you go on conceptualize and make another. There are no replicas and duplicates, which makes every original artwork a unique creation. Thank you my friends for the likes, visits, comments and follows in the less-than-a-week-old art blog. If you have time, hop over there. There is almost nothing to read in that blog, but you’ll have a whole visual world of colors to take in.~JJ
Selective focus – the photographer’s “voice”

Article Excerpt: “Selective focus can play several roles in an image. First, it can direct the viewer to the subject, or show the depth of the subject in better detail. It plays an editorial role: in-focus objects could be said to have primacy over blurry parts of the image. Sometimes a very narrow depth of field can create a sense of intimacy, exclusion, and solitude. Selective focus expresses the authorial voice of the photographer, since it is a deliberate choice. (In contrast, a scene with everything in focus often has the effect of removing the appearance of the photographer’s “voice” in the image.)…having a narrow depth of field is very “photographic” and abstract — it is an effect that humans do not experience in the real world, since our eyes are so quick to focus on other objects. Sometimes removing detail information can direct the viewer’s attention to other relationships inside the image, such as lighting, texture or shape.”~J.Gilbert from his article The Power of Selective Focus
Photo Quotes 94

Put simply, if you really want to throw the background out of focus, get really close to your main subject.~Jim Richardson (Photo location: a shooting buddy during a trip to Guimaras island, Philippines)
Emphasize with selective focus
 We’ve learned in many previous posts that composition is the process of elimination. Simplify, do away with the clutter, and place attention on the subject. One of the most popular techniques in doing this, and quite easy to learn too, is selective focus – keep the subject clear and sharp, and blur out the rest in the picture. This can be done in two ways, either in-camera or later during post-processing. The latter however doesn’t give you much control and, unless you’re adept at photo editing, the image may look “retouched.” Doing it in-cam during shooting gives a more natural-looking result. And its fun and easy to do anyway. Your camera can even do it automatically for you, or you can opt to do it manually with full control over aperture and range of focus. Now this is as much technical as it is creative, and we turn over the technical side to the expert – Jim Richardson, photojournalist and long-time National Geographic photographer. In his many photography articles at the NatGeo site, one of them – Out of Focus – On Purpose – deals with our topic. Give yourself a couple of minutes to read his enlightening tips on matters such as controlling F-stop, the importance of distance between subject matter and background, choosing the appropriate background, getting a longer lens, and many others. The point in learning selective focus is that it highlights and gives emphasis on your subject. It can be very useful in a wide variety of shooting situations – portraits, landscapes, city scenes, even events such as the bikers parade in the above picture. For festivals and street events I use my 75-300mm lens which provides me the capability to zoom in and focus on my main subject, which in the photo is the lead biker. All those behind him fades out on various levels of blur.
  On the photo below, the focus is on my nephew showing the lanzones fruit he picked off the tree in the yard. His cousins who helped him in the harvesting are softly out of focus at the back. This type of creative technique is so popular that there is a whole line of lenses exclusively manufactured for the purpose of producing selective focus, selective blur and tilt-shift effects. You’ve probably heard of Lensbaby. But you don’t have to buy their $300 to $400 lens. You can create selective focus images with the camera and lens you have now. Oh you know what to do: practice.
JJ’s art blog

The above is from the “Floral” series, a sample of the many creations I did when I started photographing years ago. In my youth I painted using watercolors and acrylic. When the camera became my brush, I continued my art but in the photographic way. It was when trying out various image editing softwares that I was able to merge photos, apply styles and effects and come up with “digital art.” All are based on photos I took. I have a sizeable collection of these creations that for a long time were tucked away in my hard disk. Now they are presented to the world through their own home, the Junsjazz Art & Vision blog. If you have time I invite you to visit the blog and immerse yourself in a world of brilliant colors, moody darkness, surreal concepts, runaway imagination and unrestrained creativity. Thanks! Happy midweek my blogger peers!
Photo Quotes 93

In a still photograph you basically have two variables, where you stand and when you press the shutter. That’s all you have.~Henry Wessel
Tools to guide us

Article Excerpt: “There are some who feel that trying to remember and apply rules stifles their creativity and hinders their photographic experience. There are others who follow every rule imaginable, never experiment, and create photographs that look like 95% of the photographs out there: compositionally sound but nothing special. Composition can be so distant a concept to some that they avoid learning it altogether or worse, dismiss it as nonsense, taking refuge behind artistic license and creativity…Composition guidelines are not our enemies but exist to help us. I think of them as tools and not rules. They originate from different arts, people, places, times, and ideas…Whatever you do, treat composition guidelines as what they are: tools and not rules.”~Gloria Hopkins from her article Composition in Nature Photography
The difference between framing and composition
 In a recent post we tackled the difference between “form” and “shape.” Oftentimes they are used similarly, but now we know they are two distinct concepts. This time we differentiate “framing” from “composition” which are also used comparatively. But one is not synonymous with the other. Framing is when you move your camera, pointing it up or down, or panning it from side to side to get that point of view or perspective. Or, you yourself go on the move – you bend, crouch, lie down, go on your side, go up on a vantage point, raise your camera above your head – all these physical efforts to get the best angle. Once you get that angle you are looking for, then you compose your shot. Composing is simply arranging the elements that you have framed. This requires thinking. You now draw knowledge from your cerebral vault all that you have read, the tips and techniques you’ve learned. If it’s a landscape shot, you know that to be effective you need a great background, a good middle ground and an eye-catching foreground as subject to serve as focal point. Composing is eliminating and simplifying. Take away the clutter and the unnecessary. Focus on the point of interest. For the trained photographer, composition will not require much thought. It becomes almost a reflex action, because he knows what to look out for in his composition – something interesting and engaging – the visual elements of colors, lines, shapes, forms, textures, patterns and light. Framing is the preliminary. Composing is where you put the elements together. Now, how effectively you placed these elements in relation to each other will either make or break the image. That’s how critical composition is. For further reading, I recommend this article How To Compose Photos Instead of Just Framing Them from PhotographyTalk. Have a great week ahead my blogger friends!
Photo Quotes 92

The central act of photography, the act of choosing and eliminating, forces a concentration on the picture edge – the line that separates in from out – and on the shapes that are created by it.~John Szarkowski
The difference between form and shape
 We use the words “form” and “shape” interchangeably. There is however a distinction. This article What Is the Difference Between Shape and Form In Photography provides a basic explanation that distinguishes between the two, and how they correlate to the concept of “space” and how, when combined, creates the element of photographic composition. We’ve been exposed to shapes early on – triangles, rectangles, squares and those with many sides (hexagon, pentagon, etc.). In a photograph, an object comes across as two-dimensional. In the accompanying photo, we know the shape of the ball, in the same manner that we know the shape of a wheel, a plate, saucer, a complete pizza, a coin as examples. When viewed flat, they are all round or circular in shape. When light falls on the subject, like the ball in the picture, it produces dark areas and shadows, highlighting its length, width and depth, and producing a three-dimensional form with the negative space around it. Learning to use this concept of space in combination with the shape and form of central subjects will help in determining the viability and effectiveness of our composition. We know the shape of a tree. When we photograph that tree with the light of a sunset in the horizon, it will cast long shadows and create a dramatic form. Composition comes to fore when we combine our focal point (the tree, already in its interesting form) with other elements in the space around it, say distant mountains in the background or a verdant field surrounding it. The thinking photographer already envisioned the scene, and it is a matter of arranging these elements in the frame to come up with a compositionally pleasing shot.
The other blogs of JJ
Junsjazz Art & Vision – a gallery of photography-based digital art works by yours truly. I’ve been creating these images for some time now and they have accumulated in my hard disk. Hence I made a blog just today to showcase and share them. Only a few postings so far in the blog’s first day but more will definitely be added.

Junsjazz Cool & Smooth – If you’re into smooth jazz, soul, funk and fusion music, this is the blog for listening and enjoying them either through live concert videos or music players. Bits of info about the featured artist/musician are added in.

There you go folks, three of my greatest passions – photography, digital art and jazz music – now each with their own home. I hope you get to visit them. Thanks!
Put focus and clarity on what matters

Article Excerpt: “…to focus on something is to pay attention to it, presumably because it matters. From a technical viewpoint, issues of focus have a great deal of impact on the success or failure of an image. Looking at things a little more broadly, you need to know (consciously or unconsciously) what is important to you about a photographic subject, or your composition will fight your content rather than work with it….You must truly care about what you photograph to muster the energy, persistence, and creative juices that are needed to see a photographic task to the end. Don’t believe those who think of photography as something than can always be done casually. It is often (but not always) the case that the more effort you put into your photographic work, the more you will get back.”~Harold Davis, Focusing on What Matters from his article series Becoming a More Creative Photographer
Photo Quotes 91

My quest, through the magic of light and shadow, is to isolate, to simplify and to give emphasis to form with the greatest clarity.~Ruth Bernhard
Festival fever
 Tomorrow, the last Sunday of January, is the culmination of one of the biggest if not the biggest tourism event in the Philippines – the Dinagyang Festival of Iloilo City in the central part of the country. It has been voted for three consecutive years in the past by a national organization of tourist and travel operators as the No. 1 tourism event, rivaling the equally grandiose Sinulog Festival of Cebu City. I had the opportunity a couple of years back to cover the Dinagyang event together with my photo buddies from Metro Manila and I tell you, even for locals like us who watched it for the first time, it was an experience unlike any other. Now the Philippines is a “fiesta country.” Every town and city celebrate a fiesta of sorts in honor of a patron saint. There’s almost a fiesta everyday somewhere all year round. These usually consist of local beauty contests, drum and bugle competition, the community parade and a culmination night in the city gymnasium or town square where there are special numbers, live bands and fireworks show. Some places have kept the celebration small, others through the years have become a national showcase and tourism attraction – the likes of the Ati-Atihan in Kalibo City, the Sinulog in Cebu held last weekend and tomorrow’s Dinagyang in Iloilo. These premiere festivals that attract thousands of visitors from within the country and from all over the world are virtual explosions of colors, of tribal and local costumes, elaborate choreography, beats of drums and music. It is a flurry of synchronized movement from the performers garbed in their most eye-catching attire. It is the “Mardi Gras” of East Asia. I will run out of words to describe the magnificence and sheer pageantry of these events. But I will not run out of photos I took and the best of them will be presented in the next issue of Junsjazz Digital Magazine which will come out this February. It will be in direct contrast to Issue #5 which was all black and white. Issue #6 will be all about the colors of Fiesta!

A short blogging break
 I’ll be out for two or three days. I’ll be going to Metro Manila to attend to some matters. The metropolitan capital of the Philippines is two hours north from where I reside. I probably won’t be blogging until this weekend. I hope I get through it. Like most of you, blogging for me has become a daily activity. A day seems incomplete without me posting something. But anyway I leave you with the photo above. Let’s always be inspired, creative and clicking. For us artists – writers, poets, photographers – its our way of life. Take care everyone!
Photo Quotes 90

So why does black and white photography command such acclaim? One reason is that colour is a distraction. It takes attention away from the visual building blocks of a great photo; texture, tonal contrast, shape, form and lighting. A photographer shooting in black and white has to learn how to use all these elements to create a memorable image.~Andrew Gibson
Maximize vantage point to get “the shot”
 “One of the most common mistakes an amateur/novice photographer makes is to take the majority of their photos standing up with the camera held near chest or eye level. Although this is the most comfortable/natural orientation it’s not the one that is going to yield impressive or unique photos. Everybody else is doing it and if you’re interested in taking photos that are going to impress an audience outside of friends and family it’s time to get down & dirty, climb, contort & twist your body all over the place.” I love this opening salvo of Samuel Jeffery from his article Change Your Vantage Point/Travel Photography Tips. We’ve touched on the topic of “point of view” from a previous post and this here is another one to emphasize its importance. I said in my previous post that people I’m with when out on vacation or travel don’t like my habit my wandering off and separating from them. I usually go to the “unbeaten path” and that’s the way of photographers. They search for other angles, for elevations, for vantage points. They will crouch, bend, go down low or stretch, tiptoe and peer above the crowd (if there’s any) or go up high and perch on something. The photographer will look at all possible positions to get that one shot that will not be the same from the throng of camera-toting, casual tourists. The above photo of the scenic Chocolate Hills, the main attraction in the tourist island province of Bohol in the Philippines, can only be taken with this vantage point – another hill. One of the roughly 1,200 similarly sized and shaped hills was converted into a viewing park and to reach the top you have to climb a stair or a pathway some 200 feet up. With an army of tourists with you at the top, all of you will have the same point of view. And all of them are snapping away. How do you get a different shot? No amount of body bending can make a distinct image. Here’s where patience came in handy. I eyed some dark clouds in the horizon and waited for them to move nearer. They did. The result is the shot above. The photographer will find ways. Ever since he held his first camera, it has always been a journey of finding ways to get “the shot.”
Issue #5 is online
 Yes folks, you can now enjoy Issue #5 of Junsjazz Images & Inspiration Digital Magazine. It carries an all black and white theme and features the following photographers and a selection of their works:
Shannon James O’Neill
Richard Cooper-Knight
Xavi Geis
Emiliano Valdarquis
Petra Stridfeldt
Jennifer Koe
My heartfelt thanks to them for sharing their time and talent in this ongoing digital publishing project. Same gratitude goes to six other photographers I have previously featured. You’ll notice that Issue #5 has an edgier design and meticulous lay-out. I guess I wanted to outdo myself with each new Issue. I hope you’ll have a great time going over it as I did creating it. Again, put on those headphones for a multimedia experience. Thanks!
Black & White: subjects in a whole new light
Article Excerpt: “When you first approach your subject, you need to imagine how it will look without colour. Try to look at it in terms of lines and shapes, shadows and contrasts. You will begin to see your subjects in a whole new light. You may even find yourself zooming in on a particular feature, or photographing the subject from an angle you might never have considered in the past. One thing is for sure; once you get into the ‘black and white headspace’ your camera will express the character of the subject in an entirely different way.”~Andrew Goodall from his article Black and White Photography: Open Your Eyes to a Different Reality

Photo Quotes 89

It is a little detail that can ruin a fabulous image. The lack of a straight horizon in a photo can wreak havoc on the viewer of your photos. Because our bodies are designed to keep our view level, looking at a photo with a tilted horizon causes a disquieting confusion between the inner ear and the brain. The brain wants to tilt to straighten the appearance of the horizon while the inner ear says the person is already level.~Liz Masoner
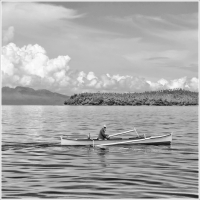
Where to place the horizon line
 Unless its a skyline of jagged peaks and mountains in a land-locked scene, your horizon won’t be a straight line. But if those mountains meet the sea in the distance, that meeting point will usually be a straight narrow line. We encounter these horizons during nature shoots – landscapes, seascapes, vistas, sunsets and sunrises. Now when framing, where do you place the horizon line? Should it be in the upper portion or lower portion? It depends on what you are going to highlight. If your subject is in the foreground, your horizon line will naturally be higher as you’ll be focusing on subjects down below, nearer you. If your subject is the sky or in the sky or up in the clouds, you’ll be pointing up and your horizon line be at the lower portion of the frame. What if your horizon line cuts across the middle of the frame. Others consider this a no-no. It just doesn’t follow through with the rules of composition. But heck, what are rules anyway? If the mountains in our example cast an interesting reflection on the sea, oh shoot to your heart’s content with the line in the middle. You are shooting for what is appealing, interesting and captivating; not for any rules. In the picture, my main subject is the man rowing his boat. I could capture him whole by zooming in, but I wanted also to include the subtle rays of the sun during that late afternoon so I pointed up a little. Which is why the horizon line placed lower from the middle portion, and it was okay since I had nothing to include in the foreground as it was all water. What was important was my main subject against an enchanting backdrop. And another thing, keep your horizon line level. Unless, for whatever effect and purpose you have in my mind, you want it tilted to one side. More on this topic from our mainstay photography instructor Darren Rowse with his write up Getting Horizons Horizontal.