Discovery and development

Photography for me has always been these two activities – discovery and development. I have been photographing for almost a decade but half of it can be considered the juvenile stage. It was my snapshooting years. With my first point and shoot cam, it was literally that – shooting where I point. There was no thought in taking pictures. I was a tyro, a neophyte in the world of photography. True, I dabbled in painting and drawing in my youth and hence had an artistic sense in seeing and composing. This would not be put in use until 5 or six years ago when I developed the creative side in my photography – observing, thinking, composing, getting a better grasp of the technical. I unshackled myself from being a slave of “Auto” and basked in the new-found freedom of “Manual.” I did not go Pro because photography is not my main source of income, though there have been business entities and organizations who have directly bought some of my images. Its been some fruitful and productive years for this hobby of mine, and I saw myself, gauging from the images I have produced, grow and improve little by little, step by step, always discovering, learning and absorbing everything that has to do with digital imaging. Oh, just keep on clicking my friends!
Photo Quotes 151

I don’t think you can create luck. You’re either lucky or you’re not. I don’t know if it’s really luck or if it’s just curiosity. I think the main ingredient, or a main ingredient for photography is curiosity. If you’re curious enough and if you get up in the morning and go out and take pictures, you’re likely to be more lucky than if you just stay at home.~Elliott Erwitt
On the hunt
Article Excerpt:
Always have your camera with you and always keep your eyes open. Serendipity plays an enormously important role in travel photography. You never know what you are going to run into, and you have to be ready. Many times you will see what could be a good photograph but decide that the light is not right, or there are no people around, or too many—something that means you will have to come back later. But sometimes you get lucky. You happen to stumble upon a scene at just the right moment. If you forgot your camera, are out of film, or your digital card is full, if you have to fumble around getting the right lens on, the moment may be gone before you can recover. This is true whether you are doing street photography or visiting a natural or man-made site. Mountains, trees, monuments, and other static subjects are, of course, not going to go anywhere, but the ray of sunshine, the soaring eagle, or the embracing couple that add the needed element to your photograph are unlikely to hang around. Think of it as hunting—whenever you leave the confines of your camp, you should be ready and able to capture whatever pops up.
~Robert Caputo from his article Travel Photography Tips
The challenge of rainforests

Article Excerpt:
There are three aspects of rainforest photography that must always be kept in mind; 1) it is very hot and very humid in tropical rainforests, 2) it is dark in rainforests, and 3) there will be lots of neat things way up in the canopy that you will not be able to photograph, and things you will hear but never be able to see! Frustrating but fun!
In the “good old days” of film photography, the heat and humidity could sometimes cause the shutter mechanism of a camera to slow or simply stop working. Digital cameras do not have this weakness, BUT – moisture is the enemy of anything electronic. There are obvious tools to use, such as a small umbrella carried in the camera bag to hold over the camera to shoot in the rain, but more subtle than the threat of rain is that of the humidity. If you take a camera out of an air-conditioned room into a hot humid environment, moisture will condense not only on the outside of the camera and lens, but possibly inside as well. A simple solution is to keep you camera and lenses in an air-tight case, and allow time to adjust to the heat before opening the case. If you have an air-tight case, load it up with moisture-absorbing packets before your trip. A more simple approach is to keep your camera and lenses (and flash) inside sealed Zip-lock bags for a few minutes when leaving a cold room. It is OK to take them directly from the heat into your cool room – let them cool down and any moisture evaporate before putting them back in their Zip-lock bags.
It is dark in the jungle! Look for shafts of light landing on flowers or insects to find interesting contrasts. Always have your flash, and realize that without a powerful flash you probably will not be able to photograph those birds and monkeys (especially the ones that are moving!) that you see 30 feet in front of you! Plan on using your flash a lot – take extra batteries! Remember the value of fill-in flash…
~from the article Taking Photos In The Rainforest
Photo Quotes 150

We walk by wonders every day and don’t see them. We only stop at what shouts the loudest.~Barbara Bordnick
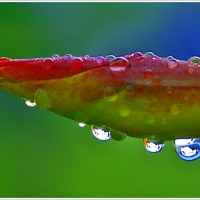
Surprises
This photography thing sometimes gives me surprises. Though I have been photographing nearly a decade now and am sure, more or less, of the outcome of my camera’s settings, there are shots that still surprise me. Like the one below which looks straight out of an apocalyptic scene – a lone plant representing hope and life amid the ruins, smoke and the blackened sky brought about by a nuclear holocaust. Forgive me, that’s just my imagination running wild.

Actually last weekend I was at a resort that featured 11 swimming pools of various sizes, shapes and depth. As I was exploring the resort complex I came upon this 6-foot high stalk with a single set of leaves at the top. Good, I thought, because I can take the shot from under. But as it was mid day, I knew the result would just be a silhouette of the leaves against a backdrop of a cloudy, yet semi-bright sky. So I used fill flash. The subject was lit up in all its vibrant color but everything else around – the sky, clouds, sun, treetops and other structures – were enveloped in darkness. I was hoping to have a bright subject under a relatively bright background, but was pleasantly surprised to have the above result, and I like it anyway – the “apocalyptic look.”
Note: Today I mark two milestones after blogging for nearly eight months here at WordPress – this is my 500th post and I just exceeded 500 followers (real WP followers and not those culled from social media sites). Not really earth-shattering stats but they are correlated – for every post I make there is a corresponding increase in followers, especially from the second month onwards. Likewise, the increase in followers egged me to write and do more postings. I take this chance to thank each and every one of you who have learned a thing or two, or who have been inspired a bit by this blog. Let us all keep on clicking!
When and where to use B&W

Article Excerpt:
Photography is very often about using the best tool for the job—both in terms of hardware and technique. One of the more flexible, if misunderstood tools that every photographer should have in their bag is black-and-white shooting. Knowing when to leave color out of your shot, and how it will ultimately affect the quality of your image, is key to understanding this very traditional form of photography. Black-and-white shooting can make certain drab shots look fantastic, but it’s not for every situation. Knowing when and where black-and-white is appropriate is key to getting the most from the technique.
~TJ Donegan from his article From Gray to Great: Tips for Taking Better Black and White Photos
Emphasizing with B&W

Article Excerpt:
Black and white helps to learn the basics without getting too distracted; this is one reason why it is so popular among teachers. Black and white focuses the attention on form, shading, pattern, and other graphic concepts, to give them an unusual quality with tone and hue.
With a clear view toward graphics, composition, and design, the photographer can concentrate on:
- How contrast creates lines and how lines lead the eye or psychologically affect the viewer by curving, lying flat, diagonal, or vertical.
- How shapes or lines make a pattern and how shape with texture gives an object form.
- How highlights compete for attention and dark tones create an important negative space.
Many artists prefer black and white because it causes the photographer and the viewer to see the world in a way that cannot be seen with the naked eye.
Seeing the reoccurring pattern, line, or shape is easier with black and white, which does such a good job of emphasizing it. This is especially the case when a black and white photo shows good contrast – when the blacks are black, the highlights are bright, when you can still see some detail in both the highlights and the shadows.
~The Merits of B&W from BetterPhoto.com

Your perspective

Article Excerpt:
Perspective is the way you look at the things around you. Yes, a cable wire may just be that – a cable wire. But the fact that it is ordinary, doesn’t mean it isn’t worthy as a subject for your photograph. This is where having a photographer’s perspective comes in handy!
The key to producing photos with unique perspective is to be open about your point of view. What are the techniques you can use to do this? Here’s a few:
- Take a moment to imagine your subject from different points of view and angles.
- Get low or move above your subject to see it from another angle making it seem big or small.
- Move away from the subject, or nearer to the subject to create a new perspective or to give the subject a bit of space.
- Stroll around your subject. There may be an unusual or interesting viewpoint you haven’t seen from where you’re standing.
- Work with the light source. Lighting can help you present your subject in ways you hadn’t thought of before.
Be like a child
The photo below is a toy of my niece. It’s a multi-colored plastic springy thing shaped like a star. I looked through it and saw, well, a star-shaped tunnel. Immediately I took my camera and tried to poke the lens through the toy to get a shot. I struggled to get a shot and tried to bend here and there the springy, elastic toy. My niece was amused at what I was doing. I was like a child again, not playing with the toy, but trying to muster a decent shot.

We photographers are the curious, inquisitive type. Upon seeing a potential photographic subject, we stare and take a look, and often fuss about it. We become a child again, wide-eyed, all the while thinking of how to tackle the subject – the angles, perspective, framing and composition. Which is a good thing because it opens our eyes to observe carefully and “see” things in a whole new light.
Martin Lee Leddy has this to say from his article Using Your Inner Child’s Eye:
“Let your eye wander to the normally unnoticed things, and go photograph them. Morning light is a wonderful source of inspiration for taking macro photos of insects, flowers, dripping water, dew covered spider webs and other things we haven’t looked for since childhood. Use wide angle lenses for photos of scenery, and search for opportunities to take other photos of things that later in the day carry no mystique. Look for dew drops, coiled hoses, shadows on the buildings and photograph them all. Enjoy seeing the wonder through the eyes of your inner child. Remember, Look for the details!”
Once the lens was snugly fit inside the other end of the springy toy, I smiled at my niece and beckoned her to look at the camera’s viewfinder and she let out a loud “wow!” upon seeing the image (which is the above photo).
Photo Quotes 149

Sometimes a photograph offers the photographer a gift he didn’t expect, a marvelous detail – what the eye longing for meaning sees unconsciously, and includes.~John Rosenthal
The great wheel

Last weekend I was again, my second time, at the Mall of Asia in Metro Manila. My previous post about this Mall was titled The Random Shot wherein I was at an escalator inside and randomly took a picture of a geometrically interesting glass and steel ceiling. No thought and preparation came into that shot. This time around I was outside the Mall complex but within its grounds was this gigantic Ferris Wheel towering probably some ten stories high. I had an hour to spare and I wasn’t going to pass up this one without thinking of my shots and approaches. This was my first time to shoot a Ferris Wheel, and just how does one photograph something that is sure to strain the neck? Let me count the ways…Seriously, I had lots of angles and perspectives to choose from. It was high noon with thin linings of clouds; I was shooting against the light. That backdrop of sun and sky became key elements in the composition. Here is a short but spot-on tip on how to tackle the subject of Ferris Wheels:
“Ferris Wheels are a great spectacle to photograph…Going beyond the standard tourist photographs of minimal distortion (good, but not the most original) and taken at a distance away from the Ferris Wheel, try to position yourself close-up and photograph with a wide-angle lens. If the Wheel is illuminated – experiment with a slow shutter speed and capture the circular motion, creating a blur of colour and light, and remember to fill the frame – wasting no space in your composition!”
~Ferris Wheel Photography from Scott Photographics Inspiration
If I had stayed till sunset I could have captured more colorful and subdued photographs and could have experimented with long exposure. Anyway, do visit the link above which also showcases lots of Ferris Wheel images to give you an idea on the various ways to photograph this interesting subject. Here are but two of the many images I took last weekend.

The urban feel

Article Excerpt
Towns and cities often have their own unique “feel” that makes them different from anywhere else. A successful urban landscape photo should capture this essence, but it isn’t always an easy task. The key is to think about what the place means to you, how it makes you feel, and what places are special to you. Then look around for a way to introduce this feeling into your photo.
Small details can really add atmosphere to an urban landscape photo, so try to include them alongside the more obvious subjects such as impressive buildings or monuments. Things like an overflowing rubbish bin, a cracked pavement tile, or a traffic jam tell a story in themselves, and help to give your urban landscape shots context.
Don’t forget that the vibe of a city doesn’t always need to be a positive one – sometimes you might want to show just how dirty and unfriendly a place is. Your photos should always tell a story from your point of view – after all, urban landscape photography is just as much about self-expression as it is about showing off a town or city.
~Urban Landscape Photography Tips from PhotographyMad.com
Photo Quotes 148

The real shape is the circular image by the lens. I have to compose within that circle. Therefore, the problem of square versus rectangle does not disturb me. It is easy to compose a horizontal or vertical image within a circle.~Philippe Halsman
Fresh feel

Ad Excerpt:
Shooting aspect ratio 1:1 photographs, the square format will expand your creative enjoyment with the fresh feel of the framing and the strong subject presence produced by limiting the image field. This format is also convenient for blog use.
~Product feature of the GR Digital III from Ricoh.com
Note: the photo above was taken not with a Ricoh GR digital camera but with my Canon DSLR. The photo was used to illustrate the “fresh feel” of using the 1:1 aspect ratio, which is a camera feature of the GR.
Finding wisdom in the square

A previous post of mine (Aspect ratios: those squares and rectangles) presented the various aspect ratios available in cameras and editing softwares (as cropping options). There are lots of them but the most commonly used in still photography are 16:9, 4:3, 3:2, 5:3, 3:1 and 1:1. Aspect ratios are important in printing and composition. I have used the first three since those are my favorite aspect ratios for landscapes and general shooting situations. They are also my cropping guides. The 1:1 or square format has not really been my fancy, though works of the early masters were mostly in this format. This is explained by the fact that they used large format cameras which had this native aspect ratio. It was only recently that I saw the wisdom of the square. Far from being constricted in a box with equal sides, I find that the 1:1 format allows you a tight but harmonious composition. It gives you a chance to fill the frame with your subject without having too much space to play with. You know the feeling when you’re framing – do you put the subject further to the left or to the right? In a square frame, you do not have much leeway to put the subject too far on either side. This aspect ratio prefers neither the vertical nor horizontal, the bottom nor top. You’re working on a “square circle.” Your organizational and compositional skills come to fore. You have only too much space on all sides. You have to have harmony, balance and a sense of suitable placement for your subject. And that I think is the challenge and wisdom of this 1:1 format which is the preferred orientation of the likes of Diane Arbus, Richard Avedon, Brett Weston, Edward Weston, Andreas Feininger, Eliot Porter, John Sexton and many other giants of photography. I guess I’d be squaring up more. Have a great weekend everyone!

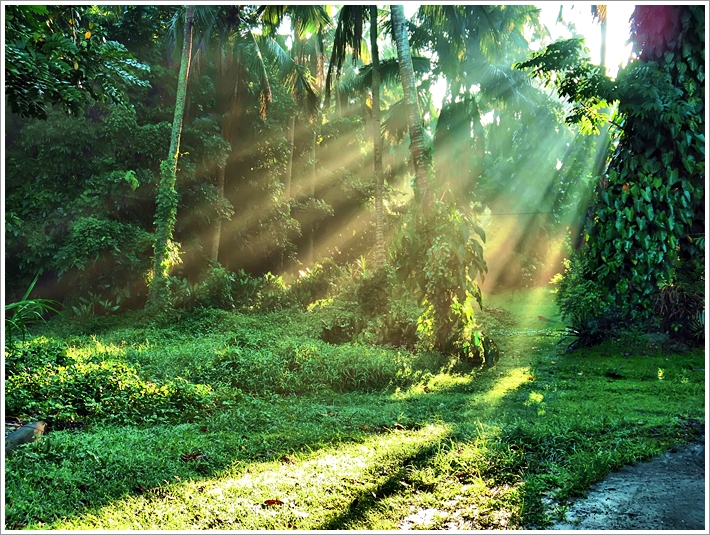
In awe

I stood in awe from the vantage point of an elevated field. I was at the border of two provinces and the vastness of the scene was overwhelming. A giant cloud cast its shadows at the mountain range in the horizon, leaving dark blotches on the ground. The valley below was all lit up by the midday sun, exposing its verdant flourish. It was nature blooming in vegetation, silent and invigorated by a glorious day. Photographers have been taught to take pictures in the golden hours of sunset and sunrise to take advantage of colorful skies and soft, dreamy light. But who can resist this scene, though harsh and bright, in the middle of the day? The sun may be unrelenting at this hour yet the natural environment revels in it, and it is incumbent upon the photographer to capture life and nature as he sees it whatever time of day.
Photo Quotes 147

What’s really important is to simplify. The work of most photographers would be improved immensely if they could do one thing: get rid of the extraneous.~William Albert Allard
Seeing the simple

Article Excerpt:
Keeping things simple has two components…You do not have to wait until there is a special occasion or you have an amazing subject to snap a picture. If you look closely at the world around you, you will find many simple subjects that would make terrific photographs. The curve of a table leg, the basket that holds some magazines, or the curve of a leaf are all simple subjects that can make dramatic photos. Keeping things simple opens the world around you to many new photographs that you might otherwise overlook.
The second component of keeping it simple is the background of your photo. While our eyes can see depth and easily pick out the subject, cameras flatten the image and it is important to make sure there are no distractions in your final image. Once you know what you would like your subject to be, look through your camera and make sure that there is nothing distracting from your subject. Is there a very bright color in the background, something that is bigger and towers over your subject, or something that is such a similar color that your subject blends into its background?
Simple images can be just as dramatic as complex images. Your camera angle, lighting, and composition are the elements that make a photograph spectacular. Pick any subject, pay attention to the background, and experiment. You might be surprised at the image you capture.
~Connie McGouldrick from her article Keeping Digital Images Simple – Digital Photography Tips
Think away the color

Article Excerpt:
Black and white photography is a bit of an odd way to describe this type of photography. A black and white photo often contains mainly grey tones. This is why black and white photos are often called monochrome photos too.
Black and white photos give you their information by using luminance variations, not by showing variations in color. Your thoughts are not distracted by the colors and therefore the attention goes to subject, composition and lighting.
Not every subject is suited for a black and white photo and it isn’t always easy to ‘see in black and white’. There are, however, things you can pay attention to when looking for good subjects for your black and white photos. Subjects with lots of contrast will be more suited by the large variations in luminance. The right light is important; light that’s coming from an angle will make textures stand out. Light coming for only one direction will produce big differences in light and shadow…
Experienced black and white photographers are often able to think away the color in a scene. They imagine the scene in black and white. To do this, you’ll need a lot of practice, but it’s possible for anyone to learn. If you have a hard time trying to see in black and white you can always just take a black and white shot and view it the camera display. If you’re not using RAW, retake the shoot in color to be able to perform you’re own conversion instead of relying on the standard black and white conversion.
~Elja Trum from his article Black and White Photography; The World Without Color